OU ILT 25
Making an improv tree block starts with the right tools
Simple tricks for perfect echo quilting Easy 16-patch diamonds with the ESSENTIAL

Sew Easy 60° Triangle Ruler
Adding lattice to your quilt top
Creating a label is a cinch with the PFAFF creative ambition 640
Easy 6-point stars without Y seams
ISSUE
MACHINES DESIGNED TO
delight & inspire
JADE ™ | 20
sewing machine
Large Sewing Space - 200mm (almost 8") to the right of the needle
Sewing Guide located in the lid 82 Beautiful 7mm Wide Stitches
Uniquely Designed Accessory Compartment
Simply Impressive
The SINGER® | Elite series offers an elegant and remarkably durable line of new machines designed to provide greater piercing power, enhanced speed, and versatility.


4, 3, 2 Thread Capability for 16 Stitches
Full Access Looper Threading Differential Feed for perfectly even seams Integrated Seam Guide
1,300 Stitches per Minute
TRIBUTE ™ | 150C
150th Anniversary HUSQVARNA® VIKING® special edition sewing machine


Limited Edition Accessory Kit included in the box
Includes 5 Presser Feet: Invisible Zipper foot, Open Toe foot, Edge Joining foot, Adjustable ¼" foot, Clear Piping foot
Exclusive SEWING ADVISOR™
160 Stitches and 3 Sewing Fonts
Graphic Display
Exclusive Sensor One-Step Buttonhole for perfectly balanced buttonholes every time
5 Bonus Presser Feet Included!
2 Computerized Sewing Machine Elite | CE677 Mechanical Sewing Machine Elite | ME475
SINGER and the Cameo “S” Design are trademarks of The Singer Company Limited S.a.r.l. or its Affiliates. © 2022 The Singer Company Limited S.a.r.l. or its Affiliates. All rights reserved. VIKING, JADE, AMBER, SEWING ADVISOR, and TRIBUTE are trademarks of KSIN Luxembourg II, S.a.r.l. HUSQVARNA and the “H” Crown Device are trademarks of Husqvarna AB and are used under license. ©2022 KSIN Luxembourg II, S.a.r.l. All rights reserved. #husqvarnaviking
machine
Machine Elite | SE017
overlock
AMBER ™ S | 100 Overlock
Fully accessible looper area!
The goal of every quilter is to make extraordinary quilt designs as easy a process as possible. It's like mapping out the quickest fuss-free journey to the binding. In this issue is a spectacular star design that is a attractive design element for many quilters but a bit intimidating at first sight.

I’m so glad to share with you Claire Haillot's 6-point star without Y seams. Claire's method for creating her 16-patch diamonds makes this quilt project look harder to make than it is. She shares many tips for accomplishing it, like how to iron the seams and echo quilt the star for a professional finish! There's a lot of wow factor in one single star!
For days you just want more ‘freedom’ in your quilting time and just go with the flow, check out

Paul Léger’s no pattern improv tree quilt! This is a great time to use pieces of fabric in your stash you’re not sure what to make with them. Paul uses two colors in his but as you will see in his feature it can be done using a multitude of colorful fabrics! This would be so lovely in a child’s room.
Take a look at the PFAFF creative ambition 640 feature created to celebrate PFAFF’s 160th birthday! Apart from its many interesting capabilities, shown in this issue is how easy it is to make quilt labels on this entrylevel embroidery machine. I prefer an embroidered label over any other kind, keeping all things sewn, and this machine makes it easy in three simple steps.
I hope you find all tips shared in this issue useful to you. Over the time it takes for warmer weather to arrive there is a lot to explore indoors quietly quilting.
Enjoy the issue,


3
Cheerfully,
3 OUILTsocial
| issue 25
Editor's Letter
OUILT
PUBLISHER, EDITOR-IN-CHIEF, ART DIRECTOR
Carla A. Canonico carla@QUILTsocial.com
PUBLISHER, ADVERTISING SALES
John De Fusco john@QUILTsocial.com
PHOTOGRAPHERS
Carla A. Canonico, John De Fusco
BLOGGERS/CONTRIBUTORS
Paul Léger paullegerquilts.com
Claire Haillot quiltingwithclaire.com
GRAPHIC & WEB DESIGN
Carla A. Canonico carla@QUILTsocial.com
GRAPHIC ASSISTANT and SOCIAL MEDIA
Sondra Armas
Maria Corina Guillen
WEBSITE / BLOG : https://QUILTsocial.com


Like us on Facebook : QUILTsocial
Follow us on Pinterest : quiltsocial
Follow us on Instagram : quiltsocial
Follow us on Twitter : @QUILTsocial
WHERE TO GET YOUR COPY
QUILTsocial is a quarterly eMagazine published by A Needle Pulling Thread. It is available free for personal use online at https://QUILTsocial.com
A limited number of printed copies of QUILTsocial are available for purchase at select quilt shops and specialty stores. Ask for it at your local shop. QUILTsocial is not available by subscription.
QUILT SHOPS
If you are interested in carrying QUILTsocial in your store, please email john@QUILTsocial.com

EDITORIAL
Designers and other contributors who would like to be considered for future issues please email carla@QUILTsocial.com with a brief description of your work and your proposed project for the magazine.

©2023 QUILTsocial. All rights reserved. Issue 25. ISSN 2368-5913
No part of this publication may be reproduced without written permission from the publisher.
All designs, patterns, and information in this magazine are for private, non-commercial use only, and are copyrighted material owned by their respective creators or owners.
4 | issue 25 OUILTsocial Advertiser Index 35 A Needle Pulling Thread Magazine 34 Business Directory 02 Husqvarna Viking 15 Olfa 36 PFAFF 04 QUILTsocial.com 08 WEFT Fest
FREE! ALL Visit QUILTsocial.com and download our free ebook Elaine’s Quilting Tech Tips! { daily blog { weekly newsletter { quarterly magazine { fun Facebook page { yummy Pinterest page { app on iTunes/Google Play { ALL of the above! projects techniques product reviews * * *
CONTENTS
6 Easy 6-point stars without Y seams: What you need to get started
7 7 steps to warm up to a 6-point star project with a 4-patch diamond
9 16-patch diamonds are easy with the ESSENTIAL Sew Easy 60° Triangle Ruler

11 The secret to perfect alignment on a 6-point star is REVEALED!
13 Simple tricks for perfect echo quilting


16 Making an improv tree block starts with the right tools
18 Marking your fabric to cut duplicate blocks – no pattern required
20 What to do with leftover fabric: Sew a tree!
22 Finishing a quilt block to size: Here’s what it takes
24 Adding lattice to your quilt top

26 Introducing the PFAFF creative ambition 640: Sewing AND embroidery
27 More great features on the PFAFF creative ambition 640
28 Creating a label is a cinch with the PFAFF creative ambition 640
30 Embroidery personalizes an essential Back to School pencil case
31 Positioning a zipper on a pencil case PLUS the finishing touches
33 Paul Léger's TIPS
5 OUILTsocial | issue 25 issue 25
OUILT
Easy 6-point stars without Y seams: What you need to get started
Last year, I featured an oversized diamond hexagon pillow and got some great feedback from quilters who made the project during their very first post-covid quilting retreat! Thanks again by the way! It’s always great to hear from you and see what you make with our ideas. When I saw the pictures, it made me realize that I actually made two smaller pillows to go with it, but never got a chance to post them. So, here’s my chance to set the record straight! I’ll show you how to complete the set with these lovely 6-point star pillows that are a breeze to make using extremely helpful tools like the Komfort Kut 360° Rotating Cutting Mat and OLFA Quick Change Rotary Cutter

Many quilters hesitate to make diamond shaped designs because they usually require Y seams. But you know me. I love a challenge and diamonds! And I found easy tricks to make diamond shape quilts without having to sew Y seams.
materials
fabric

I used the scraps of fabric from the Kaffe Fasset Collection left over from the oversized diamond hexagon pillow I made, along with the following fabrics.
• ½ yd [0.5m] for the background fabric
• ¾ yd [0.7m] for the back of the finished pillow
• 2 – 20” x 20” [50 x 50cm] for the back of the pillow top (for quilting)
• 2 – 20” x20” [50 x 50cm] Fairfield Toasty Cotton Natural Cotton Quilt Batting thread
• Gütermann Cotton 50wt Thread
• Gütermann Cotton 30wt Thread –Golden Sunset
• Gütermann Cotton 30wt Thread –Rustic Holiday
• Gütermann Cotton 30wt Thread –Autumn Leaves
notions
Claire Haillot
• Komfort Kut 360° Rotating Cutting Mat
• Sew Easy Triangle Ruler 60°
• OLFA Quick Change Rotary Cutter
• Klassé Universal Sharps Needles – Size 70/10
• Omnigrip Ruler - 6” x 12”
So, gather your stuff and get ready to begin this new project. And if you’re planning to take part in a quilting retreat, I have to share my new quilting gadget I just splurged on in preparation for my upcoming quilting outings. Just before COVID, I got a new sewing machine that’s quite large and had difficulty finding a traveling case for it… Not anymore! You’ll be happy to hear that Vivace now carries three different sizes of sewing machine trolleys.
• Regular size (20½” x 14½” x 9”)
• Large (22” x 14½” x 10”)
• Extra Large (24” x 17¾” x 12¼”)
The trolleys all have telescopic locking handles, durable wheels and ample pockets. The compartment opens up completely with a sturdy zipper and contains a strap to secure your machine. They also have zippered storage areas. But the extra-large trolley has a large zippered front compartment plus a wide lip and clip to secure cutting mats and rulers. I no longer need to drag another bag for those! And I love that the compartment opens up top and front of the bag so I don’t have to load my machine from the top.
I love the Vivace Extra Large Sewing Machine Trolley. It’s a great new addition to my quilting gear and I recommend it for traveling with your sewing machine!

 You can finally create diamond shape quilts without having to sew Y seams!
The Extra-Large Vivace Sewing Machine Trolley
The Extra-Large Vivace Sewing Machine Trolley is perfect for oversized machines
You can finally create diamond shape quilts without having to sew Y seams!
The Extra-Large Vivace Sewing Machine Trolley
The Extra-Large Vivace Sewing Machine Trolley is perfect for oversized machines
6 | issue 25 OUILTsocial
7 steps to warm up to a 6-point star project with a 4-patch diamond

Here’s a nice warm-up to get you to enjoy diamond-shaped quilts. I’ll show you just how easy it is to make what I like to call a 4-patch diamond. Because it is as simple as the regular 4-patch!


Instructions to create the 4-patch diamonds
Step 1
• Cut a 2½” strip from 12 of your scrap fabrics.
• Using your Sew Easy Triangle Ruler 60°, cut one edge at a 60-degree angle.


See the material list in previous page, so I’ll get straight to the instructions on how to make the first 6 units for the two cushion blocks.
Step

• Sew 2 strips together, while trying to keep the 60-degree aligned.

• Makes 6 strip units.
 Photos by Claire Haillot
4-patch diamonds are the first step to my 6-point star pillow.
4-patch diamonds are a cinch to create.
Cut 2½” strips and trim one edge at a 60-degree angle.
Sew 2 strips together while trying to keep the 60-degree aligned.
Don’t sweat it! You can trim off any excess.
Make 12 units.
Now for the fun part!
2
Photos by Claire Haillot
4-patch diamonds are the first step to my 6-point star pillow.
4-patch diamonds are a cinch to create.
Cut 2½” strips and trim one edge at a 60-degree angle.
Sew 2 strips together while trying to keep the 60-degree aligned.
Don’t sweat it! You can trim off any excess.
Make 12 units.
Now for the fun part!
2
| issue 25 7 OUILTsocial
Step 5
• Press your seams open using the Oliso Pro TG1600 Pro Plus Smart Iron. This helps you sew the units together in the next step.
Note: Having the ‘ears’ pop out helps you align your units and get a perfect block.
The secret is pressing your seams open!
Step 6
• Position the two units, right sides together, align the ‘ears’ and stitch to make a perfect 4-patch diamond.

Step 7
• Repeat the steps to make 6 units.
Congratulations! You’ve warmed up to making a 6-point star by succeeding in making the first unit: the 4-patch diamond using tools such as the Komfort Kut 360° Rotating Cutting Mat, Sew Easy Triangle Ruler 60°, and the OLFA Quick Change Rotary Cutter to make the creative process easier.


Align the ‘ears’ and stitch to make a perfect 4-patch diamond.

8 | issue 25 OUILTsocial
Make six 4-patch diamonds.
Having the ’ears’ pop out helps you align your units and get a perfect block.
16-patch diamonds are easy with the essential Sew Easy 60˚ Triangle Ruler
I’m going one step further and showing you how to make a 16-patch diamond using the very essential Sew Easy 60° Triangle Ruler.

Step 2
• Sew 2 strips together, while trying to keep the 60-degree aligned.
• Make 6 strip units.
Remember that it doesn’t have to be perfect! Just as I explained yesterday, you can simply use the ruler again to trim any excess.
Step 4
• Match your Step 3 units in groups of 2.
• Play around with them and see which combination makes the fabric pop.

• Sew each group together lengthwise (see photo).
• Make 12 units.
16-patch diamonds are the key to a striking 6-point star pillow.

Instructions to create the 16-patch diamonds
Step 1
• Cut a 1½” strip from 12 of your scrap fabrics.


• Using your triangle ruler, cut one edge at a 60-degree angle.
Sew 2 strips together, while trying to keep the 60-degree aligned.
Step 3
• Use your 6” x 12” Omnigrip Ruler to cut two 3½” units from each Step 2
• Make 24 units.
Sew each group together lengthwise.
Don’t worry! Once again, your units are larger than needed so that you don’t have to align your fabric perfectly. You can use the Sew Easy 60° Triangle Ruler to trim the excess.
Cut 1½” strips and trim one edge of each strip at a 60-degree angle.
Aligning your ruler to cut 3½” strips from the step 2 units
Don’t sweat it! You can trim off any excess.
| issue 25 9 OUILTsocial
Step 5
• Use your 6” x 12” Omnigrip Ruler to cut two 1½” strips from each unit you made in Step 4

• Make 24 units.
• Stitch 2 matched Step 5 units together, while aligning the ‘ears’ to help get a perfect seam alignment.
• Repeat to have 6 groups of 2 units. Now I think you understand why I strongly recommend, for this project, opening your seams.
Step 6
• Match your Step 5 units in 6 groups of 4 units.
It was a breeze for me to press the seams open using the Oliso Pro TG1600 Pro Plus Smart. Step 7
• Stitch the 2 matched group units together while aligning the ‘ears’ to help get a perfect seam alignment.
• Repeat to make a total of six 16-patch units.
Play around with your strips and see how they best show off your fabrics.
• Play around with them and see which combination makes the fabric pop.


• Press your seams open as this helps you sew the units together.
 Having the ’ears’ pop out helps you align your units and get a perfect block.
The secret to a great-looking 16-patch is pressing your seams open!
The Sew Easy Triangle Ruler 60° makes it easy to succeed!
Make 24 units.
Having the ’ears’ pop out helps you align your units and get a perfect block.
The secret to a great-looking 16-patch is pressing your seams open!
The Sew Easy Triangle Ruler 60° makes it easy to succeed!
Make 24 units.
10 | issue 25 OUILTsocial
The secret to perfect alignment on a 6-point star is REVEALED!
You’ll learn how to stitch them together in a cinch again using the Sew Easy 60° Triangle Ruler to trim your fabric to perfection. Simply grab your 4-patch and 16-patch units, and let’s make some magic.


Instructions
Note: Read all instructions before you begin Step 1
Take your six 4-patch diamonds and your six 16-patch diamonds and lay them out to make two six-point stars, alternating the 4 and 16 patches.
•
Position the units to form a 6-point star by alternating 4-patch and 16-patch diamonds.
Step 2
From the background fabric, cut 8 - 5” x 4½’’ rectangles.


• With the Sew Easy Triangle Ruler 60°, trim one edge of a rectangle. Repeat to make 4 (A).
Step 3
Position the A and B units from Step 2 on the left and right edges of your 6-point stars.
• Stitch units A and B to the diamond units.
• Repeat for both 6-point star units.
Step 4
From the background fabric, cut 4 – 12½” x 7½” rectangles.
• Align the Sew Easy Triangle Ruler 60° using the 11’ horizontal line on the base of the rectangle.


• Trim the opposite edges of the rectangle.
• Repeat to make 4 (C).
It’s Magic! 6-point stars without having to sew Y seams!
Then, trim the opposite edge of a rectangle. Repeat to make 4 (B).
Use the Sew Easy Triangle Ruler 60° to trim the rectangles. Cutting the background fabric to the perfect shape
Position units on the left and right edges of the six-point stars.
| issue 25 11 OUILTsocial
Trimming both edges using the Sew Easy Triangle Ruler 60°
Step 5
Position the C units from Step 4 on the top and bottom edges of the 6-point stars, as shown in the photo.
• Stitch the C units to the diamond units.
• Repeat for both 6-point star units.
Position units on the top and bottom edges of the six-point stars.
Step 6
From the background fabric, cut four 8¾” x 7½” rectangles, then:


• On the rectangle fabric, align the Sew Easy Triangle Ruler 60° using the 7½” horizontal line on the base of the rectangle.
• Trim opposite edges of the rectangle.
• Repeat to make 4 triangles. (D)

Step 7
From the background fabric, cut 8 – 12½” x 7½” rectangles.


• Use the Sew Easy Triangle Ruler 60° and trim one edge of the rectangle. Repeat to make 4. (E)
• Then, trim the opposite edge of the rectangle. Repeat to make 4. (F)
Step 8
Position the D triangles, E, and F units on the top and bottom edges of the sixpoint stars, as shown in the photo.
• Stitch to the diamond units. There will be excess fabrics on the edges of E and F units.
• Press the seams open.
• Repeat for both 6-point star units.
Step 9
Stitch the top 3 diamond units together, and align the ‘ears’ from the background fabrics to ensure correct seam alignment
• Repeat with the bottom 3 diamond units.
• Press the seams open.
• Repeat for both 6-point star units..
The secret to perfect alignment is simple! For proper alignment:
• Ensure diamonds are accurate using the Sew Easy Triangle Ruler 60°.
• Press the seams open using the Oliso Pro TG1600 Pro Plus Smart Iron.
• Align the fabric ‘ears’ when stitching.
Stitch
Step 10
Stitch the two 6-point star units together, and align the ‘ears’ from the background fabrics to ensure correct seam alignment.
• The center of the star should align automatically.
• Press the seams open.
• Trim off excess fabrics. Makes an 18½” square.
• Repeat for both 6-point star units.
Hoping you’re enjoying the process and liking the results!
Remember…using special tools and notions like the Komfort Kut 360° Rotating Cutting Mat, Sew Easy 60° Triangle Ruler, and OLFA Quick Change Rotary Cutter, are essential to successful 6-point stars.
Position units on the top and bottom edges of the six-point stars.
the top 3 diamond units together and repeat for the bottom 3 units.
Stitch top and bottom halves together!
The key to ensuring perfect alignment is behind the seams.
Creating a 6-point star without having to sew Y seams!
12 | issue 25 OUILTsocial
Simple tricks for perfect echo quilting


I discuss my tricks to quilt these two lovely 6-point star pillows. You’ll be surprised at how quick and easy it is to do. All you need is to mark a few lines in advance with the Clover 517 - White Ink Marker - Fine Point, and you’ll have precision quilting.
materials
fabric
• 2 – 20” squares of Fabric Creations 100% Cotton Fabric
• 4 – 18½” x 13” pieces of fabric for the back of your pillows (I used Kaffe Fassett fabric)
• 2 – 20” squares of Fairfield Toasty Cotton Natural Cotton Quilt Batting
thread
• Gütermann Cotton 30wt Thread –Autumn Leaves
notions
• Odif 505 Temporary Quilt Basting Adhesive Fabric Spray
• Klassé Quilting Needles Carded - Size 80/12
• Clover 517 - White Ink Marker - Fine Point
• Omnigrid 1” x 12” Ruler
Using Odif 505 adhesive spray, sandwich the stars onto the batting and backing. Now for the quilting, I used my stitch in the ditch quilting foot and a variegated thread for the diamond patches. I started by quilting in the ditch the three seam lines that go from edge to edge of the pattern. These are the seams that hold the 6-point stars together.
Before continuing to quilt, I marked the diamond shape for accurate quilting using the Omnigrid 1” x 12” Ruler and Clover 517 - White Ink Marker - Fine Point
• Mark the inside edge of your diamond shape at 3⁄8”.
Note: 3⁄8” is the space between the needle of my sewing machine and the edge of the stitch in the ditch quilting foot.
• Mark the diagonal line from the center to the outer edge point of the diamond. Here’s a video demonstrating the marking of my diamond unit.
Echo quilting made easy
The following video explains how I quilted the echo diamond design onto my diamond units on my pillow.
Now, if you watched to the end of the video, you likely noticed the end of the quilting does not have a perfect diamond. I was concentrating so much on making the video that I missed that part. So, I did like every quilter does at this point. I pulled out my seam ripper and corrected the quilting. Here is the video I made showing the proper way to end the quilting with a perfect diamond shape.
Now to quilt the background fabric of the 6-point star, I decided to simply quilt an echo design around the star. To ensure the quilting is perfect, you need to mark your fabric once more. Grab your ruler and align it from the center of the star to the outer edge of a diamond unit, and mark the line from that point to the edge of the pillow. Repeat for all 6 diamond sections. Here’s a video to explain how. Now here are two videos demonstrating how I quilted the echo design on the background fabric.
The first video explains how to quilt the first 2 echo lines. The second video explains how to quilt echo lines to finish the quilting. Now that the quilting is completed, trim off the excess and finish it into a pillow. To make the back of the pillow, check out Christine Baker’s post on Sewing up the back porch pillow
I hope you enjoyed following my tips and that you’ll make these beautiful pillows. Stop being afraid of making stars and see how easy and fun these are to make with the right tools such as the Clover 517 - White Ink Marker - Fine Point and the Omnigrid 1” x 12” Ruler! Please do share your finished project with me by tagging your images with #TheSewGoesOn.
Claire Haillot quiltingwithclaire.com
The first step is to sandwich your 6-point star project.
Perfect echo quilting
| issue 25 13 OUILTsocial


14 | issue 25 OUILTsocial and there's so much more! don't miss these projects & tutorials online! READ NOW PFAFF creative ambition 640 works wonders for Holiday Decorations READ NOW Use the OmniArc Circle Cutter Ruler to create unique designs READ NOW Squares make a great looking table runner: Make your own design .com OUILT Creating a stitched flower design that’s perfectly curved | HV Tribute 150C READ NOW


15
I've seen many posts on social media about Christmas in July and local quilt shops showing new Christmas fabrics. This gave me the idea to make a simple, easy-to-make Christmas-themed tree quilt. I’m making tree blocks in three different ways. By the time this quilt is finished, I’ll have another quilt ready for the birth of my friend’s next child. This quilt measures 34½” x 44½”. Here are some of the awesome tools I’m using to create this quilt.

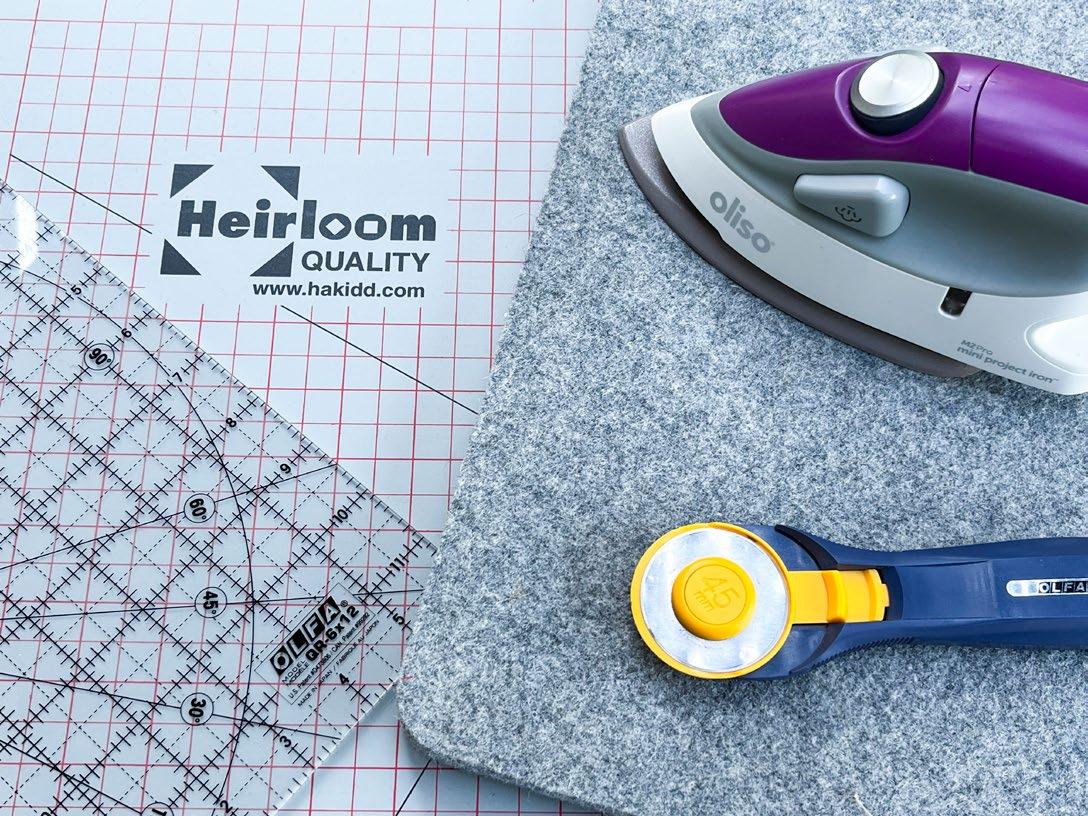
Making an improv tree block starts with the right tools
Paul Léger
Here are other essential materials for this project.
• 1yd [0.92m] fabric for the first tree
• 1yd [0.92m] fabric for the second tree
• 1½” [1.27cm] fabric strip for tree trunks
• 2⁄3yd [0.61m] fabric for lattice
• 1⁄3yd [0.31m] fabric for binding
• 1½yds [1.4m] fabric for backing

• SCHMETZ needles
• OLFA 45mm Splash Rotary Cutter in navy blue
• OLFA 12½” Square Frosted Acrylic Ruler
• OLFA 6” x 12” Frosted Acrylic Ruler
• Heirloom 24” x 36” Double Sided Cutting Mat
• Oliso M2Pro Mini Project Iron with Solemate - Orchid

• UNIQUE Quilting Wool Pressing Mat14” x 14” - Gray
Before we start, I want to talk about sewing needles. What needle should we use for sewing or quilting? The safest bet is to get a variety pack such as the SCHMETZ #1739 Quilting Needles Carded - Assorted Sizes or the SCHMETZ #1856 Piecing and Quilting Needles Pack Carded – Assorted.
As there are no industry standards when it comes to thread weight (wt), needle size is important. Most quilters sew with 50wt threads; therefore size 80/12 or 90/14 needles work best. Why? The small channel on the front of the needle and the needle’s eye are the correct sizes for the 50wt threads.
If the same thread brand and size are always used, then only one size needle is required. But for a quilter like myself, on some projects I switch thread brands, causing me to use multiple-size needles. I often use three to five different brands for one project.
Here are three other reasons why I like assorted packs.
1. There are two to three needle sizes per card making them great to bring to a workshop or retreat.
2. The size included in the assorted packs is the most commonly used by quilters.
3. It’s easier to bring one multipack than bring several packs of several sizes.
Tree quilt
Photos by Paul Léger
Tools used for this quilt
16 | issue 25 OUILTsocial
Now the fun begins:

From each of the two fabrics you selected to make the trees, use the OLFA 12½” x 12½” square ruler to cut eight 10” x 10” blocks. Once the blocks are cut, pair them, putting the wrong side of one with the right side of the other.
There are now two tree shape triangles and two sets of background. Use the fabrics you last cut, and with a ¼” seam, sew the tree shapes to the opposite color for both sets.


My iron and ironing board are not in my studio, and I’m ok with this as it gets me off my chair and makes me move. When I know I’ll be pressing a lot in a short period, I set up a small pressing station next to my sewing machine with the UNIQUE quilting wool pressing mat. With my Oliso Pro Mini Project Iron, I’m all set to press. For this project, I press toward the darker fabrics.
If the two pieces don’t perfectly align after sewing and pressing, simply trim.
After trimming the edge, sew on the other piece of background fabric to the tree fabric.
Now the first of two tree blocks is complete.
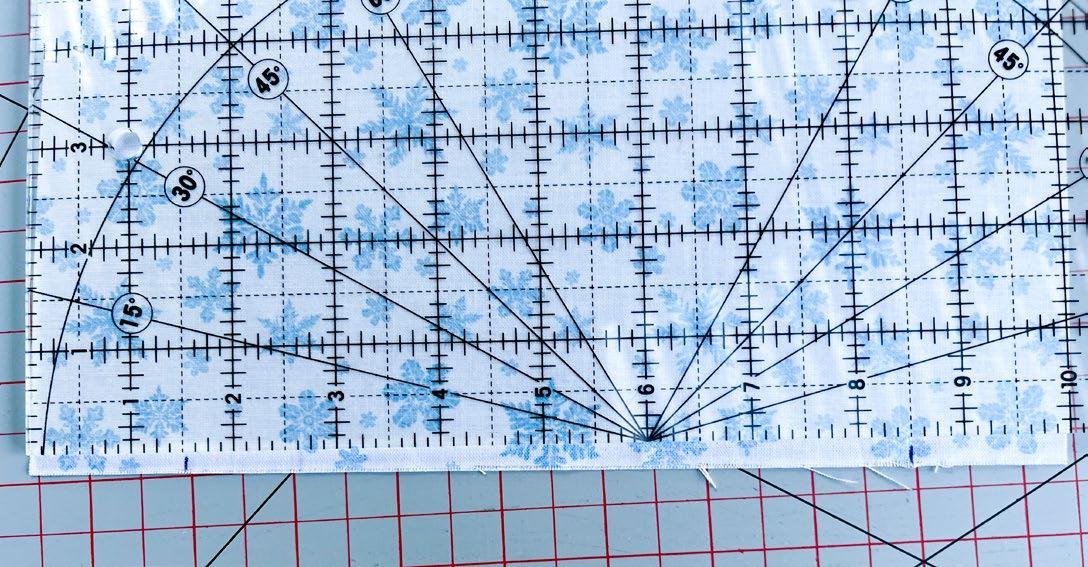
This is the fun part. Place the OLFA 6” x 12” ruler diagonally on a fabric pair.
Note: Don’t start a diagonal line from a corner. It’s better to start at least 1” from the corner.

As you can see in the above photo, the ruler more or less goes to the center. Once the ruler is where I want it to be, I cut through both layers of fabrics and separate both pairs. I then place the ruler diagonally going in the other direction and cut as shown next.


Normally the next step is to square off the blocks. But, for now they’re staying as they are.
I enjoyed all the tools I used for this project, especially setting up my mini sewing station using the UNIQUE quilting wool pressing mat and the Oliso Pro Mini Project Iron. I can’t suggest strongly enough how important it is to have these items in your sewing tools collection. Trust me, they won’t go to waste.

 SCHMETZ needles assorted pack
Place the OLFA 6” x 12” ruler diagonally on a fabric pair.
Make a second cut by placing the ruler diagonally in the other direction.
Press toward the darker fabric.
To ensure there is a straight edge, trim.
SCHMETZ needles assorted pack
Place the OLFA 6” x 12” ruler diagonally on a fabric pair.
Make a second cut by placing the ruler diagonally in the other direction.
Press toward the darker fabric.
To ensure there is a straight edge, trim.
| issue 25 17 OUILTsocial Your Authorized Dealer for: BRAMPTON SEW N SERGE 7-289 Rutherford Rd S, Brampton, ON L6W 3R9 905-874-1564 www.BRAMPTONSEWNSERGE.com Arnprior Shopping Centre 375 Daniel St S, Arnprior, ON K7S 3K6 www.sewinspired.ca 613-623-0500 info@sewinspired.ca Sewing, Knitting & Having a Good Time Ottawa Valley Authorized Dealer
Two completed tree blocks.
Marking your fabric to cut duplicate blocks – no pattern required

Now, for the sewists out there who only use the one thread brand and weight, yes there are SCHMETZ needles you can purchase that are all the same size such as the SCHMETZ #1709 Universal Needles Carded - 80/12. These single-size packs are available in many other sizes.


I’m using the same tools I mentioned:
• OLFA 45mm Splash Rotary Cutter in navy blue
• OLFA 6” x 12” Frosted Acrylic Ruler
• Heirloom 24” x 36” Double Sided Cutting Mat
• Oliso M2Pro Mini Project Iron with Solemate - Orchid

• UNIQUE Quilting Wool Pressing Mat - 14” x 14” - Gray


This method of making a tree block is very similar to what we did yesterday. The difference is, with this technique you can make multiple trees that are all the same.
To get identical blocks, you need to place little marks on the fabric to indicate where to put the ruler.

On the top of a 10” x 10” square piece of fabric, I place 2 little marks, each at 4” from the edges.

Tools needed Place a mark equidistantly from each edge but close to the center. 18 | issue 25 OUILTsocial 1390 Clyde Ave, #107, Ottawa, ON K2G 3H9 Sales & Service of Baby Lock, Brother, and Elna sewing machines, and Q'nique longarm quilting machines 613-695-1386 www.ottawasewing.com Your Authorized Dealer for: Ottawa Sewing Centre www.kellyscreativesewing.ca 902-435-7380 Specialize in Sewing, Embroidery machines, Sergers and Long arm Quilting Systems 804 Main Street Dartmouth, Nova Scotia B2W 3V1 kellyscreativesewing@gmail.com Phone: 519-425-4141 info@kaquiltstudio.com www.kaquiltstudio.com K&A Quilt Studio Where Friends and Creativity Meet! Authorized distributors 90 Samnah Crescent Ingersoll, ON N5C 3J7
SCHMETZ needles
On the bottom of the 10” x 10” square, I place two more marks, this time 1½” from each edge.
Place
Layer two different colored fabric squares.
Place the OLFA 6” x 12” Ruler from the lower left mark to the upper right mark. Then cut two layers of fabric like I showed you.

Gently separate the cut pieces from each other while ensuring the ruler is still on the bottom right marks and the new mark, then cut.
After you cut the fabrics, don’t move the fabrics. Place the ruler from the bottom right mark to the mark on the upper left.


The process to sew the block together is the same as it was. This is not a difficult block to make. If the desired effect is to get all identical blocks for your quilt, then this method is the one you should use. The previous block was more improv, so all blocks have different shaped trees.
As I mentioned earlier, if you prefer to use only SCHMETZ needle packs with one-size needles only, such as SCHMETZ #1709 Universal Needles Carded - 80/12, you can.
 a mark equidistantly from each edge but close to the outer edges.
Place the ruler from one mark to another.
Place the ruler from the bottom right mark to the upper left mark.
Make a small mark where the ruler intersects with the cut line.
a mark equidistantly from each edge but close to the outer edges.
Place the ruler from one mark to another.
Place the ruler from the bottom right mark to the upper left mark.
Make a small mark where the ruler intersects with the cut line.
| issue 25 19 OUILTsocial
Make a second cut.
What to do with leftover fabric: Sew a tree!
The needles I used for this project are the SCHMETZ #1839 Microtex Needles Carded - Assorted Sizes. These needles are popular with quilters because of their precision when working on miniature quilts and while using microfibers such as, but not limited to, silks, foils, and artificial leathers. These needles have a very thin acute point that creates beautiful topstitching. I also love using the Microtex 60/8 and 70/10 needles when I’m sewing with threads that are 80 or 100 weight. The fine needles and fine treads are made for each other.

This technique involves making a pieced tree block using leftover pieces of fabric or fabric strips.


After I cut the 10” x 10” blocks, I still had the small fabric pieces left from where the fabrics were folded.
From the widest piece of each fabric color, cut a triangle. With the remaining pieces, cut strips that measure anywhere from 1” to 1½”. Don’t worry if the strips are a bit wider at one end than the other.
The technique to make these tree blocks is very similar to the method used to make a log cabin block. The only difference is strips are sewn to two of the three triangle’s sides only.
SCHMETZ Microtex needles assorted pack
Using leftover pieces of fabric to create a tree block
20 | issue 25 OUILTsocial
Cut leftover fabrics into strips and triangles to create trees.
To start, sew a strip onto one side of the triangle. Press, then trim.

Sew a strip to the triangle, then press and trim.
For the next step, sew another strip on the other side of each triangle. Then go back and forth to each side adding more strips. Remember to press and trim as strips are added. I stopped adding strips when the base of my trees approached 6”.


Note: Since this block is another form of improvisational piecing, it doesn’t matter if the strips are not the same width. Just take the next one on the pile and sew.
Add strips until the desired tree sizes are reached.
Once the trees reach the desired size, pin the trees in place on a piece of 10” x 10” background fabric.
Sew the background to the tree using the same method I demonstrated before. Remember to press the blocks after you sew all the pieces together.
Remember to stock up on SCHMETZ needles such asSCHMETZ #1839 Microtex Needles Carded - Assorted Sizes. There’s a needle type for all sewing projects!
 Align the ruler along the edge of the tree.
With the ruler in place, cut. Repeat this step on the other side of the tree.
Pin the tree block to a 10” x 10” piece of background fabric.
Place a ruler along the edge of the tree.
Cut along both sides of the tree.
Sew the background to the tree and press.
SCHMETZ needles
Align the ruler along the edge of the tree.
With the ruler in place, cut. Repeat this step on the other side of the tree.
Pin the tree block to a 10” x 10” piece of background fabric.
Place a ruler along the edge of the tree.
Cut along both sides of the tree.
Sew the background to the tree and press.
SCHMETZ needles
| issue 25 21 OUILTsocial
Finishing a quilt block to size: Here’s what it takes


For those wondering what other SCHMETZ needles I enjoy using, well, they’re the SCHMETZ #1794 Twin Needle Carded80/12 - 4.0mm

I use twin needles in two ways: when I want to use bias and need to sew down both edges (the 4.0/80 twin needle is the perfect size to sew down both edges at once), and when I want to make a decorative stitch (they’re great for making parallel lines when sewing or machine quilting)
Like other SCHMETZ needles, the twin needles also come in different sizes. They’re available with wide or narrow spacing between the needles.
The next step is to trim. I always wait until all the blocks are completed before trimming. Why? Because, depending on the angle of the diagonal cuts, the fabric size, and perhaps because of one or two more factors, the blocks will be different sizes. After I complete the blocks, I measure them all. I find the smallest one, then trim all the blocks to the same size. For these tree blocks, I’m comfortable trimming them at 9” x 9”. I also always start the trimming with the bottom of the tree.
With the tree portion of the blocks done, there's one last step to finish the quilt blocks. All trees need a trunk. Once you add the tree trunk, the blocks are no longer square; they’re rectangular. How long or how short the tree trunks are is up to the quilter. I’d say at a minimum, they need to be at least 1” long. I want my quilt to be longer than it is wide, so I’m making 3½” long tree trunks.
Trim all nine tree blocks.
SCHMETZ twin needles
Trim blocks starting at the base of the tree block.
22 | issue 25 OUILTsocial
Trim all blocks to the same size.
I chose a checkerboard layout for the quilt, using 5 blocks with the green background and 4 with the snowflake background. Now that I know my layout, I need to cut the following for the tree trunks.


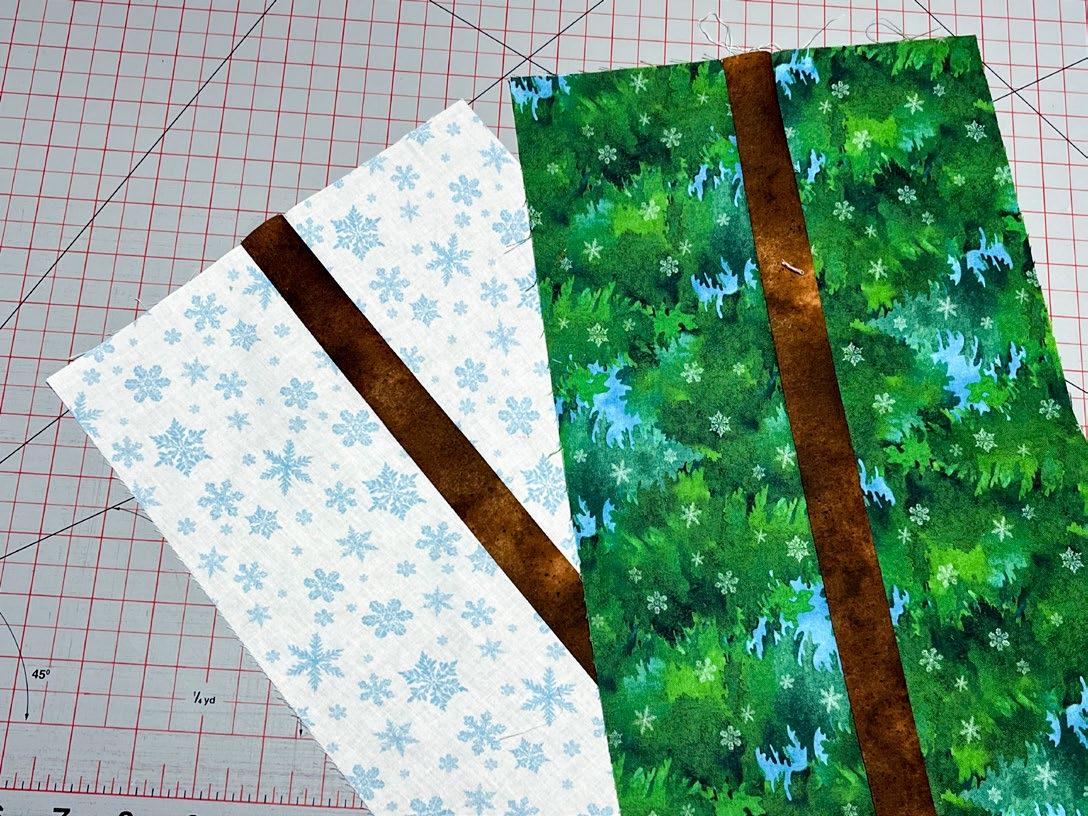
• Two brown strips, one measuring 1½” x 20” and one measuring 1½” x 16”.
• Two green strips, each measuring 4¼” x 20”.

• Two snowflake strips, each measuring 4¼” x 16”.
Create strata by sewing a green strip on each side of the 1½” x 20” brown strips, and then sewing the snowflake strips to the 1½” x 16” brown strip.
Sew the tree trunk section to the base of the tree block. In most instances, the tree trunk is not centred. Don’t worry about that, it adds to the whimsicalness of the blocks.
With the tree trunks sewn to the tree, the blocks are done. The blocks now measure 9” x 12½” unfinished.
In addition to demonstrating how to make cool tree blocks, I also wrote about SCHMETZ needles. I know many sewists only use one needle type or size at a time. Now and then we all work on a project which requires needle changes during the creating process. When this happens to me, there’s a little tool I use to help me keep my needles sorted while working. It’s the Grabbit myPad Machine Needle Organizer. It even has a spot for pins. It’s a very nice tool to have. Anything to help me stay organized is a plus.
There’s only one more step to finish the quilt top. Keep reading to find out how I add some lattice to the quilt blocks.
Sew a brown strip between two snowflake fabric and two green fabric strips.
Cut strata sets down to 4” sections.
Sew a trunk section to each tree block.
The myPad by Grabbit
| issue 25 23 OUILTsocial
Cut each stratum set down to 4” sections.
Adding lattice to your quilt top

There are several ways to prepare the quilt top for quilting; it may be basted with thread or safety pins, or it may be basted using an adhesive spray. If you baste with thread or safety pins, I recommend using SCHMETZ #4019 Chrome Quilting - 90/14 that’s because I use a heavier weight thread such as 40wt or 32wt, and the size 90/14 needle eye is better suited for these heavier threads.

Also featured in the photo above are the SCHMETZ #4502 Super Nonstick Needles Carded - 80/12 and the SCHMETZ #4501 Super Nonstick Needles Carded - 70/10 What I like about these needles is that they’re indeed nonstick. I find this very useful when I use an adhesive spray or sticky interfacings which both can leave a residue on the needle. With the nonstick needles, there’s no residue left on the needles.

The last step to completing the tree quilt top is to add sashing. The sashing I decided on is 2” wide finished. I considered going wider but due to the width of the block size, I found it looked a bit off. I also decided that instead of long strips between the rows, I’d use smaller pieces along with cornerstones. Based on the size of my block, I cut:


• 16 – 2½” x 2½” for the cornerstones
• 12 – 2½” x 9” for the horizontal lattice strips
• 12 – 2½” x 12½” for the vertical lattice strips
Next, sew the lattice between each row. In this instance, we’re making what are basically narrow rows.
Each row has four 2½” x 2½” cornerstones and three 2½” x 9” strips.
Sew a lattice row between each row of blocks in addition to one on top and one on the bottom of the quilt top. With all the blocks and lattice pieces sewn together, the quilt top is completed.
 SCHMETZ nonstick and chrome needles
Sew a 2½’ x 12½” lattice strip to the right side of each block. For the blocks that’ll be on the left of the quilt, sew a lattice strip to the left of those blocks only.
Sew three rows of three blocks.
Lattice and corner stone fabrics
Add lattice strips to each block.
Make three rows.
Sew 4 rows for the lattice between the block rows.
Sew the lattice rows between each block rows.
SCHMETZ nonstick and chrome needles
Sew a 2½’ x 12½” lattice strip to the right side of each block. For the blocks that’ll be on the left of the quilt, sew a lattice strip to the left of those blocks only.
Sew three rows of three blocks.
Lattice and corner stone fabrics
Add lattice strips to each block.
Make three rows.
Sew 4 rows for the lattice between the block rows.
Sew the lattice rows between each block rows.
24 | issue 25 OUILTsocial
Now to quilt and bind. It’s so satisfying to see the finished quilt.

I wrote of and explained why I like certain types and sizes of SCHMETZ needles. Unfortunately, I couldn’t show and write about all the needles I love to use. There are so many needles for so many styles of projects. All I can say is, to get the correct needle for your project.


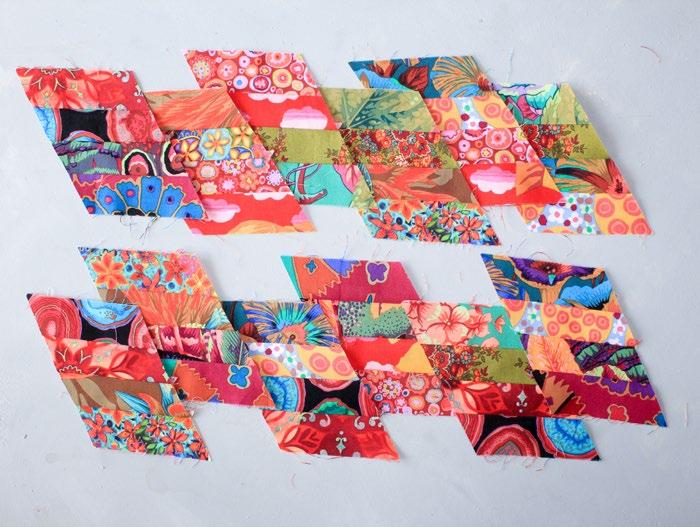
Before I complete this feature, I’d like to answer one question you may have. How do I store all my sewing needles? The answer is, in a hand embroidery floss container. If you’re wondering what a tree quilt looks like using scraps of fabrics and miscellaneous fat quarters, here’s a quilt top I completed not too long ago. I used the tree improv method to make it. Does anyone want to quilt it for me?
 Paul Léger
paullegerquilts.com
Finished quilt
An embroidery floss container to store SCHMETZ needles
A tree quilt made of scraps and miscellaneous fat quarters
Paul Léger
paullegerquilts.com
Finished quilt
An embroidery floss container to store SCHMETZ needles
A tree quilt made of scraps and miscellaneous fat quarters
| issue 25 25 OUILTsocial
Introducing the PFAFF creative ambition 640: Sewing AND embroidery
 Claire Haillot

Did I ever tell you I love birthdays? I just love celebrating special events with friends and family, so I was ecstatic to be a part of PFAFF’s birthday celebration. It’s not often you’re invited to celebrate someone’s 160 years! So just for that, I couldn’t refuse to be a part of the festivities. After hearing I’d get to try the new limited-edition PFAFF creative™ ambition™ 640 sewing and embroidery machine, I knew this was a party I didn’t want to miss. I was looking forward to the end of my vacation so I could use this beauty and have a little fun.
The limited-edition PFAFF creative ambition 640 has a sophisticated appearance and is the perfect machine for a quilter looking into a new sewing machine. Why? Because it’s also an embroidery machine perfect for making quilt labels. Now, I know many of you looked into embroidery machines and didn’t like the price tag they came with. You’ll be happily surprised with this one. That’s because it comes with an introductory PC/MAC embroidery software that lets you design labels on your computer and then using a USB stick, you can drop the design into the machine. And yes! You can embroider large projects with the included PFAFF creative Master Hoop measuring 240 x 150mm.
The PFAFF creative ambition 640 also comes with some great features for all quilters.
• A semi-automatic needle threader. You just need to push the lever and your needle is threaded.
• An exclusive accessory kit with five bonus feet.
• The Original IDT System. Call your local dealer and make an appointment to see and try out the new PFAFF creative ambition 640 as soon as it arrives. You’ll see for yourself how this elegant machine is so easy to use.
Introducing the new limited-edition PFAFF creative ambition 640 sewing and embroidery machine
| issue 25 OUILTsocial 26
More great features on the PFAFF creative ambition 640
What’s great about this machine is that it’s also an embroidery machine, without the price tag of an embroidery machine, and it’s perfect to make your quilt labels. I want to show you all the great features you get for your quilting needs.

As soon as I unboxed the sewing machine, I got started on a new project to see how it handled. I must admit, it didn’t let me down. Why would it? After all, it’s a PFAFF and as they say: Perfection starts here! I tested the machine by making a paper piecing project. The machine had all the cool gadgets I need to make my life easier.
Features

• Automatic needle up or down position
• Tie-off button
• Thread cutter
• Semi-Automatic Needle Threader
• Stitch length and width
• Speed control
• Start/Stop button if you want to piece without a pedal
• Comes with 5 bonus presser feet
Perfect stitches
Now let’s talk about the stitching. The machine has a selection of 150 stitches. But what’s important for quilters to know is that it really can hold a nice smooth straight stitch when piecing our projects. It can also stitch a smooth satin stitch up to 7mm wide when we want to create beautiful appliques. And it will delight you, should you decide to create your very own art quilts. Freemotion stippling is also available when you attach the optional free-motion presser foot, which means you can also quilt free motion on this machine.
The PFAFF creative ambition 640 comes with the Integrated Dual-Feed Technology, the famous IDT System that feeds the fabric from the top and bottom for a perfect stitch. Your stress level will also be at a minimum as the machine sets electronically your needle thread tension for every stitch and embroidery. This means you’ll enjoy piecing your quilts and quilting straight lines should you decide to not use the free motion option. You can use a regular foot and the IDT System and can quilt just fine with this machine.

| issue 25 27 OUILTsocial
Photos by Claire Haillot
The PFAFF creative ambition 640 comes with 5 bonus presser feet
Testing the PFAFF creative ambition 640 with a paper piecing project
Creating a label is a cinch with the PFAFF creative ambition 640
I’m discussing another great feature…an entry-level embroidery machine just perfect for making your quilt labels. After opening the box to your new machine, you’ll find all the information to connect to PREMIER+ 2 Intro PC Software that lets you design labels on your computer. It’s really easy to use and once your label is ready, you simply download it on a USB stick and drop the design into the machine. Don’t have a USB stick? No problem. The sewing machine comes with one that also has over 100 exclusive designs and plenty of room to store yours.
The best embroidery machine to make your quilt labels

I’m telling you, the PFAFF creative ambition 640 is the best and easiest embroidery system for a quilter who simply wants to do basic embroidery designs. But as you grow accustomed to embroidering, you’ll love all the extra features it has to offer. Here’s how quickly I managed to create a quilt label within hours of receiving the sewing machine. Of course, I had to download the software onto my computer and use the activation code that’s included in the box. Which means you need to be careful when unboxing your new sewing machine. Keep all the papers to ensure you don’t lose the activation code as it’s unique and cannot be found if lost.
3 steps to designing a label
Now, the software is really easy to use when you just want to write a quilt label. It comes with two embroidery fonts each with three different sizes. Uppercase and lowercase letters, plus numbers and symbols are built in to personalize any embroidery project.

Here are the 3 steps to creating your label.
1. Click the hoop icon on the top toolbar, and identify your sewing machine by the following:
» brand (PFAFF),
» Machine Group (PFAFF creative 4.5) and
» Hoop Size (240mm x 150mm - creative Master Hoop).
2. On the pane located on the right-hand side, click on the A
3. Choose a font style and font size, type in the letters you want to embroider, and click Apply
Create a label is a cinch using the PFAFF creative ambition 640
28 | issue 25 OUILTsocial
Design your quilt labels in 3 easy steps with the PFAFF creative ambition 640
The text now appears on the digitized hoop section on the left. You can enter as many sections as you want. I repeated the steps 3 times to get the 3 lines on my label. You can adjust the location of the text as you want. Once satisfied, you need to save the file as a vp3 on your USB stick.
It’s important to understand that PFAFF is spoiling us with a very big hoop. When looking at the text of the label in the hoop, you might not realize how big the text will actually be. So, it’s a good thing to remember this when creating the design. A good TIP: To get a good idea of sizing, first print the design on paper.
Embroidering your quilt label
Now for the fun part! The embroidering. Here’s what you need.
• Stabilizer: Position a stabilizer on the back of your fabric when placing it onto the hoop to support the fabric and thread while the design is embroidered.
• Embroidery needle: The size depends on the weight of the thread, but remember to change the needle every 80,000 stitches.
• Thread: Since this is a quilt label, you can choose a 30, 40 or 50wt thread in either cotton or rayon for your top thread. It’s better to use a 60wt thread in the bobbin in either white or black.
You now need to connect the embroidery unit to your sewing machine and attach the embroidery/free motion foot. Insert the USB stick into the USB port on the right side of your sewing machine. Use the arrow buttons to select your file and press OK You’ll then be asked to attach the hoop.

Ensure you have sufficient clearance space around your machine to allow the embroidery arm and hoop to move. Now you’re ready to lower the pressure foot and press the start/stop button. Stay close by as the machine asks you to cut the thread end when needed. This means you have to press the cut thread button, and then press OK for the embroidery to continue. If you designed various thread color changes, the machine also asks you to change the thread color. Once the embroidery is completed, your machine signals you with a pop-up. Press OK and raise your presser foot to remove the hoop. Remember to park your embroidery arm before removing it from the machine.
It’s that easy to make a quilt label when you own a PFAFF creative ambition 640
you need to embroider a quilt label
Items
640
Embroidering a label is a cinch using the PFAFF creative ambition
| issue 25 29 OUILTsocial
Embroidery personalizes an essential Back to School pencil case
The embroidery system can do much more than just embroider words. You can use it to embroider many things; there are over 100 designs on the USB stick that allows you to drop the design into the machine. Plus, there’s plenty of room on the stick to add your very own designs.

If you prefer using existing designs, consider creating a profile on mySewnet where you can use the application as a cloud filing system for all your embroideries. Various subscription options give you access to embroidery designs. But, if you don’t want a subscription, you can always purchase individual designs based on your own projects. Subscription or no subscription, the cool thing is you can still have access to many free embroidery designs. I fell in love with the Postcard Valentine pattern and decided to create a pencil case for my child just in time for back to school.
The first thing I did was download the file onto the PREMIER+ 2 program on my computer where I made a few changes. That’s the beauty of the software and the PFAFF creative ambition. You can scale your embroidery designs by 20%, bigger or smaller, and you can edit the thread colors. You can also rotate the design in 90-degree increments and add the option of basting the hoop or design area. After carefully reviewing my options, I saved the embroidery as a VP3 file onto the USB stick and went to my sewing machine. I just love that the machine came with the creative™ Master Hoop that measures 240 x 150mm. This hoop allowed me to embroider the design in the size I wanted for a pencil case.
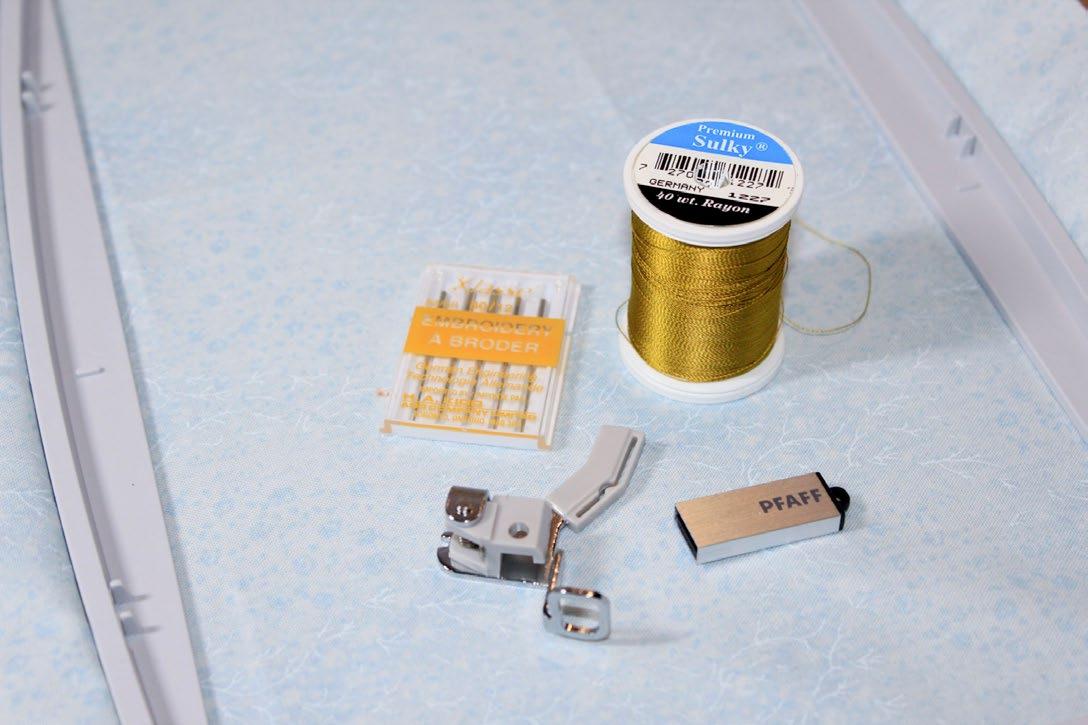
For this project, I used a yellow batik fat quarter with stabilizer, Sulky Cotton Blendables 30wt - Sunset for the hearts, and Sulky Cotton Solid Color 30wt - True Red for the words. Once my machine was set up and hooped, I simply pressed start for the magic to happen. I stayed close by to cut off threads when needed using the thread snips button, and to change the thread color.

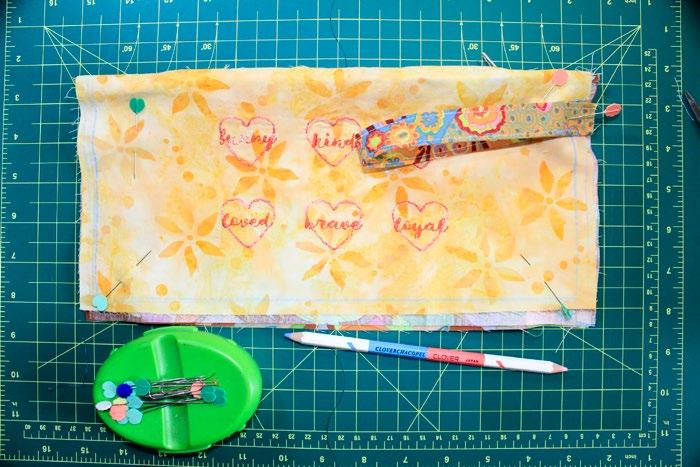
Once done, I cut out the embroidery to make a 6½” x 12½” rectangle, ensuring the embroidery was well centered. My main piece is now ready to be transformed into a personalized pencil case.
I’m really happy with the quality of the embroidery using the PFAFF creative ambition 640.
 Create a personalized pencil case just in time for back to school.
Embroideries are easy with the PFAFF creative ambition 640 and the Premier+2 software.
Create a personalized pencil case just in time for back to school.
Embroideries are easy with the PFAFF creative ambition 640 and the Premier+2 software.
30 | issue 25 OUILTsocial
The PFAFF creative ambition 640 comes with a large hoop for big projects.
Positioning a zipper on a pencil case PLUS the finishing touches
I’ll show you how to finish this wonderful pencil case project just in time for Back to School. To start, remove the embroidery arm on the machine and grab the Invisible Zipper Foot that’s part of the 5-piece bonus set included with the machine.

materials
• your embroidery on a 6½” x 12½” rectangular piece of fabric
• 1 fat quarter from which to cut:
» 3 – 6½” x 12½” rectangles
» 1 – 3” x 12” rectangle (I used a different fabric)
• HeatNBond Quilter's Edge Iron-On Adhesive Tape - 6mm x 13.7m (¼” x 15yds)
• one COSTUMAKERS General Purpose
Closed End Zipper 23cm (9”) to match your fabric
• a seam ripper such as the UNIQUE
Sewing SeamFix Red Seam Ripper and Thread Remover
• Gütermann 50wt cotton thread to match your fabric
• fabric marking tools such as the Clover 418 - Chacopel Pencil Set - Fine Point
• rotary cutter
• cutting mat
• iron
• pressing mat

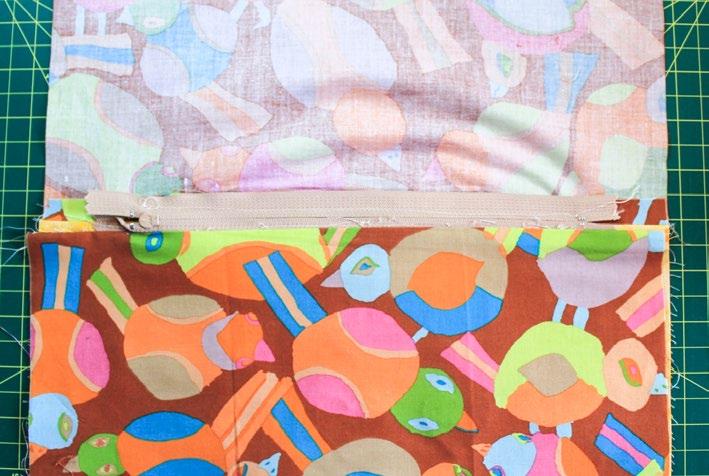
To make sure the zipper was well centered on the fabric, on the back of the embroidered fabric, I marked the center and the edges of the zipper. I did the same for one of my other fabric rectangles. Then I stitched my 2 rectangles together, right sides facing each other, using a ½” seam allowance. I stitched a regular solid stitch on both edges, but simply basted the section where the zipper goes. Meaning that for the regular stitch, my stitch length was 2.5 while the basting stitch was at 4.
2. Apply a piece of ¼” HeatNBond Quilter's Edge Iron-On Adhesive Tape in the center of each seam allowance, in the basted section, by gently pressing for two seconds with your dry iron using the silk setting.

3. Let the fabric cool off, remove the paper backing on the adhesive tape and then position the zipper. Press once more with your iron for 4 to 6 seconds.

4. Using the Invisible Zipper Foot, sew the zipper into place.
5. Flip the project over and carefully remove the basting to reveal the zipper.
Now here’s my new trick to easily position a zipper onto a project.
1. Iron the two pieces together and, on the reverse side, press open the seams.
Adding a lining
Now, you can finish the pencil case at this stage, but I prefer adding a lining to hide the backside of the embroidery. All you need to do is position another rectangular piece of fabric with the right side facing the zipper and stitch once more.
The PFAFF creative ambition 640 comes with 5 bonus presser feet.
Marking the center of the fabric and edges of the zipper to ensure the zipper is well centered
Applying HeatNBond Quilter's Edge Iron-On Adhesive Tape onto the seam allowance to secure the zipper
Carefully remove the basting to reveal the zipper.
| issue 25 31 OUILTsocial
Adding a lining to the pencil case
Repeat for the other side. Your lining is now set on your pencil case.


Finishing the pencil case
Adding a strap
Once more, you can be ready to finish the project at this stage. However, I decided to add another touch to the project, a strap! I thought it would add a nice touch and a way to easily carry the pencil case. I took a 3” x 12” piece of fabric and folded it in half lengthwise. I then folded each edge toward the center (first fold crease). Once pressed into place, I stitched a straight line on each edge. You can also use a fancy decorative stitch available on the machine or even better! Why not stitch the name of your child on the strap! It’s all possible using the PFAFF creative ambition 640.

The next step is to fold the pencil case into its finished look, right side facing you. Pin the edges together, all 4 layers, ensuring they’re nice and flat. Add the strap to an edge facing inward and secure it with pins. Stitch into place. Cut any excess fabrics around the stitch line so you only have a ¼” seam allowance all around. Then open the zipper and turn the pencil case inside out, ensuring the strap lays nice and flat inside. I like to press the seams and corners to ensure they also lay nice and flat. Stitch once more at 3⁄8”. This method gives you a nice smooth finish without having to add a binding.
All you need to do now is flip the pencil back to the right side and you’re done! You have a personalized pencil case ready to head to school with even if your child isn’t that ready!

Hope you enjoyed making this pencil case project. I sure enjoyed creating it while testing the new PFAFF creative ambition 640. I just love how easy it is to use the machine to embroider cool projects with it. Please do post your finished products on your favorite social media using #Thesewgoeson so I can see them too.
Claire Haillot quiltingwithclaire.com
 Both linings added to the pencil case
Folding a piece of fabric to create a strap
Securing the strap with a straight stitch on opposite sides
Pinning the pencil case together for final stitching
Flip pencil case inside out and stitch edges at 3⁄8” for a nice smooth finish.
Both linings added to the pencil case
Folding a piece of fabric to create a strap
Securing the strap with a straight stitch on opposite sides
Pinning the pencil case together for final stitching
Flip pencil case inside out and stitch edges at 3⁄8” for a nice smooth finish.
32 | issue 25 OUILTsocial
Personalized pencil case ready for Back to School
It’s always a good idea when doing double needlework to have spare needles. Instead of having three-needle packs with one double needle in each pack, put them all in one package. It’ll save some space they’ll all be at the same spot.
When I finish binding a quilt there is normally some binding fabric leftover. I join all those binding leftover strips together to make bindings for future scrap quilts.


When working with fabric strips a great way to keep them sorted is to hang them using sock hangers. An adult sock holder can easily hold strips which are up to 3½” wide.

PAUL’S TIPS
Paul Léger paullegerquilts.com

| issue 25 33 OUILTsocial
CANADA
DIRECTORY
Brampton Sew & Serge
289 Rutherford Rd S, Unit 7, Brampton, ON L6W 3R9
905.874.1564 bramptonsewnserge.com
monique@bramptonsewnserge.com
Welcome to Your One Stop Sewing Centre! We are authorized dealers of Baby Lock, Husqvarna Viking, and Singer sewing machines and sergers. We also offer a full schedule of sewing classes for everyone.
Brandon Sewing Centre
821 Princess Ave, Brandon MB R7A 0P5, 204.727.2752
Bytowne Threads - Ottawa, ON
1.888.831.4095 bytownethreads.com
mlj@bytownethreads.com
Featuring Aurifil thread from Italy. Long staple Egyptian cotton threads - 270 colours in 12, 28, 40 and 50 wt; 88 colours in 80 wt. Polyester Aurilux - 240 high sheen colours. Wool threads - 192 colours. Many kits available. Check our website!
Canadian National Fabric - Brampton, ON
https://canadiannationalfabric.com/
info@canadiannationalfabric.com
We are an online fabric shoppe offering a wide variety of fabrics, patterns, books and notions for all your sewing needs. Flat rate Canada wide shipping of $10. Shop in person available by appointment!
Carellan Sewing Centre
1685 Corydon Ave, Winnipeg MB R3N 0J8 204.488.2272, facebook.com/CarellanSewingCentre
Country Concessions
35 King Street N, Cookstown, ON L0L 1L0 (new address) 705.458.4546, countryconcessions.com
Gitta's
271 Lakeshore Rd E, Mississauga, ON L5G 1G8
905.274.7198 gittas.com
questions@gittas.com
Nestled in the east village of Port Credit, Gitta's is the place where stitchers meet with their stitching friends, shop for stitching supplies and see the new stitching designs from Europe and the United States.
Hardanger House, designs by Betty Stokoe Oldham
PO Box 1623, Penhold, AB T0M 1R0
403.573.2003 bettyoldham53@gmail.com
tnplisting.com/hardanger-house
Hardanger embroidery charts and kits. Designs feature contemporary adaptations of this traditional cutwork embroidery from Norway. Shop online at etsy.com/shop/ HardangerHouse. Some digital downloads available.
Haus of Stitches
626 Main Street, Humboldt, SK S0K 2A0
306.682.0772 or toll-free 1.800.344.6024
hausofstitches.ca
Our one of a kind store offers everything you need for sewing, quilting, knitting, rug hooking and needlework. Authorized dealers for Janome and Elna.
K & A Quilt Studio
90 Samnah Cres, Ingersoll ON N5C 3J7 (New Location!)
519.425.4141 kaquiltstudio.com
Where friends and creativity meet! Authorized distributor of Husqvarna VIKING sewing machines, and a Kimberbell Certified Shop. We stock full collections of quilting fabrics, featuring Northcott and Moda, plus lots of patterns, books, and samples to inspire you!
Kelly's Creative Sewing
804 Main St, Dartmouth, NS B2W 3V1
902.435.7380 kellyscreativesewing.ca
kellyscreativesewing@gmail.com
We offer sales and on-site service of high-end domestic embroidery, sewing machines and sergers, as well as a variety of educational programs.
Ottawa Sewing Centre
1390 Clyde Ave, #107, Ottawa, ON K2G 3H9
613.695.1386 ottawasewing.com
ottawasewing@gmail.com
Authorized Dealers for Brother, BabyLock, Elna, Q'nique & Grace quilting frames. Specialize in sales, parts & servicing for all makes & models of quilting/embroidery/sewing/ serger/overlock machines & cabinets by Sylvia Design.
Sew Inspired
375 Daniel St S, Arnprior, ON K7S 3K6
613.623.0500 sewinspired.ca
info@sewinspired.ca
Your Ottawa Valley PFAFF® Authorized Dealer. We have a large supply of quilting & sewing supplies, knitting supplies, as well as in stock PFAFF® sewing machines. We also have a listing of sewing and quilting classes.
Sew With Vision
480 Parkland Dr, Halifax, NS B3S 1P9
902.479.2227, sewwithvision.net
Stitch By Stitch
550 Days Rd Unit 1, Kingston ON K7M 3R7
613.389.2223, stitchbystitchkingston.com
That Sewing Place
16610 Bayview Ave #10, Newmarket, ON L3X 1X3
905.715.7725, thatsewingplace.ca
The Quilt Store / Evelyn's Sewing Centre
17817 Leslie St, Unit 40, Newmarket, ON L3Y 8C6
905.853.7001 or toll-free 1.888.853.7001
The Quilt Store West
695 Plains Rd E, Unit 6, Burlington, ON L7T 2E8
905.631.0894 or toll-free 1.877.367.7070
thequiltstore.ca
Now with 2 locations to serve you, we are your Quilt Store Destination! The staff here at The Quilt Store is always on hand to provide Quilt Wisdom, Quilt Inspiration and most of all we pride ourselves as the place to make... All Your Quilt Dreams Come True!
The Stitcher's Muse Needleart
#101 - 890 Crace St, Nanaimo, BC V9R 2T3
250.591.6873 thestitchersmuse.com
info@thestitchersmuse.com
A divine little shop with supplies for all your hand stitching needs! Friendly, knowledgeable, helpful staff. Cross stitch, canvaswork, needlepoint, embroidery, counted thread, lace making & more. Books, patterns, fabric, threads, tools.
The Yarn Guy
15 Gower St, Toronto, ON M4B 1E3
416.752.1828 or toll-free 1.800.836.6536
theyarnguy.com info@sewknit.ca
See us on Facebook, follow us on Twitter! Knitting machines, sewing machines, repairs, parts for Passap, Studio, Singer, Silver Reed, Superba, White. Sewing notions and supplies, books, ball yarns, coned yarns, TAMM yarns, Paton's yarns, Bernat yarns, Phentex yarns, Bernat kits & crafts.
Upper Canada Quiltworks – Quiltworks Studio PO Box 64, Brockville, ON K6V 5T7
613.865.7299 uppercanadaquiltworks.com
uppercanadaquiltworksstudio@gmail.com
Quilt patterns and books, fabric and notions, felted wool, wool kits, punchneedle patterns and supplies and Valdani embroidery floss. Workshops in quilting, punchneedle, wool applique, rug-hooking, sewing, sign painting & more!
UNITED STATES
A Quilter's Folly
8213 Brodie Ln #100, Austin, TX 78745 512.899.3233, aquiltersfolly.com
A-1 Singer Sewing Center
1012 S Oliver St, Wichita KS 67218
316.685.0226, a-1singer.com
Charlotte Sewing Studio
1109 Tamiami Trl Unit 2, Port Charlotte FL 33953 941.235.3555, charlottesewingstudio.com
Close to Home Sewing Center
277 Hebron Ave, Glastonbury CT 06033 860.633.0721, closetohomestores.com
Discount Fabric Warehouse
933 Kanoelehua Ave, Hilo HI 96720 808.935.1234, discountfabricwarehouse.com
El Cajon Sew & Vac
1077 Broadway, El Cajon CA 92021 619.442.2585, sewezr.com
Hursh's Country Store
2425 W Main St, Ephrata PA 17522 717.721.2575, hurshscountrystore.com
Jessamine Quilt Shop LLC
1301 Old Cherokee Rd, Lexington SC 29072-9047 803.490.1031, jessaminequiltshop.com
JS Linen and Curtain Outlet
1250 Northside Dr, Statesville NC 28625 704.871.1939, jslinenoutlet.com/js-quilt-shop
Just Sew Studio
51 Third St NE, Waite Park MN 56387 320.654.1580, justsewstudiomn.com
Keeping You Sewing 226 4th Ave S, Clinton IA 52732 563.242.6135, keepingyousewing.com
Lone Star Quiltworks 4301 S Texas Ave, Bryan TX 77802-4360 979.595.1072, lonestarquiltworks.com
Maryland Vacuum and Sewing Center 26845 Point Lookout Rd (Rt 5), Leonardtown MD 20650 240.309.4019, mdvacsew.com
New England Sewing 501 Hartford Rd, Manchester CT 06040 860.647.8119, nesewing.com
Options Quilt Shop 102 E Commerce St, Jacksonville TX 75766 903.586.9546, facebook.com/optionsquiltshop
Paramount Sewing & Vacuum 3960 Rickey St SE, Salem OR 97317 503.990.8186, paramount-sew-vac.com
Pick Your Stitch
6701 Manlius Center Rd, East Syracuse NY 13057 315.437.0962, pickyourstitch.com
Quality Vac and Sew
1213 Gilmore Ave Ste E2B, Winona MN 55987-2632 507.452.2203, qualityvacandsew.com
Quilter's Attic Sewing Center 118 Maple Ave, Pine Bush NY 12566 845.744.5888, quiltersattic.com
Quilters' Corner @ Middlebury Sew-N-Vac 260 Court St Ste 4, Middlebury VT 05753 802.388.3559, middleburysewnvac.com
Quintessential Quilts 940 East Main St, Reedsburg WI 53959 608.524.8435, qquilts.com
Select Sewing 2415 East 65th St, Indianapolis IN 46220 317.255.6332, selectsewingservice.com
Sew Special 688 W Main St, Uniontown PA 15401 724.438.1765, sew-special.biz
Sew What? Fabric Shoppe
7 W Front St, Addison NY 14801 607.359.4308, sewwhatfabricshoppe.com
Sewing Solutions
1505 S Glenburine Rd, Ste G, New Bern SC 28562-2689 252.633.1799, sewingsolutionsnc.com
Sierra Sewing, Quilting, and Vacuums 8056 S Virginia St Ste 6, Reno NV 89511 775.823.9700, sierrasewing.com
Singer Factory Distributor 4914 W Irving Park Rd, Chicago IL 60641 773.545.6834, singerfactorydistributor.com
Suddenly Sewing
5850 Kroger Dr Ste 110, Fort Worth TX 76244 817.741.5400, suddenlysewing.com
Thimbelina's Quilt Shop
118 North B St Ste B, Livingston MT 59047-2662 406.222.5904, thimbelinasquiltshop.com
Wise Monkey Quilting
501 Hwy 39 N, Denison IA 51442 712.393.7979, wisemonkeyquilting.com
34 | issue 25 OUILTsocial
BUSINESS
To list your business in this space please call 1.866.969.2678.


Visit www.ANPTmag.com to order! QUILT SEW KNIT CROCHET CROSS STITCH EMBROIDER HOOK RUGS Get quilting! A Nee dle gPullin Thread 2022 Issue 61 Inspired byTiles QUILT SEW KNIT CROCHET CROSS STITCH EMBROIDER HOOK RUGS Aneedle pulling thread www.aneedlepullingthread.com 40 A needle pulling thread 35
SMARTER BY PFAFF
sewing machine
23 Stitches and Automatic Buttonhole
6mm Adjustable Stitch Width
Integrated Needle Threader
Adjustable Needle Positions
Adjustable Presser Foot Pressure
Top Loaded Bobbin
Simply Impressive
The SINGER® | Elite series offers an elegant and remarkably durable line of new machines designed to provide greater piercing power, enhanced speed, and versatility.

admire™ 1000 overlock machine


Full Access Looper Threading - both the left and right front covers open to provide complete access to the looper area
4/3/2 Thread Capability for 16 Stitches
Integrated Seam Guide for perfectly straight seams and edges
Differential Feed for perfectly even seams
ambition™ 610
sewing machine
The Original IDT ™ System - precisely feed all types of fabric from the top and bottom for perfect stitching

LCD screen
Large 200mm sewing space (almost 8")

110 stitches up to 7mm, and Six
1-Step Buttonholes
29 Needle Positions
Mirror Image of Stitches & Elongation
Free-Motion Sewing

Speed Slider

Computerized Sewing Machine Elite | CE677 Mechanical Sewing Machine Elite | ME475
SINGER and the Cameo “S” Design are trademarks of The Singer Company Limited S.a.r.l. or its Affiliates. © 2022 The Singer Company Limited S.a.r.l. or its Affiliates. All rights reserved. Overlock Machine Elite | SE017 PFAFF.com Visit a PFAFF® dealer near you today. PFAFF, PFAFF PERFECTION STARTS HERE, SMARTER BY PFAFF, ADMIRE, AMBITION and IDT are trademarks of KSIN Luxembourg II, S.a.r.l. ©2022 KSIN Luxembourg II, S.a.r.l. All rights reserved
™
accessible looper area! EXPRESS YOUR PASSION with
operation from PFAFF
.
Fully
durable technology and artful
®
