
Based
Ham Station Utilities with the RTL-SDR


GQRX
SDR++ CubicSDR
RTL-SDR Server Dump1090
FLDIGI
RTL_433 TWCLOCK Morse2Ascii PyQSO Python! Welle.io qsstv


Dogan Ibrahim
Ahmet Ibrahim


5
booksbooks
Raspberry Pi 5 for Radio Amateurs
Program and Build Raspberry Pi 5 Based
Ham Station Utilities with the RTL-SDR
●
Dogan Ibrahim, G7SCU
Ahmet Ibrahim, 2E1GUC
● This is an Elektor Publication. Elektor is the media brand of Elektor International Media B.V.
PO Box 11, NL-6114-ZG Susteren, The Netherlands
Phone: +31 46 4389444
● All rights reserved. No part of this book may be reproduced in any material form, including photocopying, or storing in any medium by electronic means and whether or not transiently or incidentally to some other use of this publication, without the written permission of the copyright holder except in accordance with the provisions of the Copyright Designs and Patents Act 1988 or under the terms of a licence issued by the Copyright Licencing Agency Ltd., 90 Tottenham Court Road, London, England W1P 9HE. Applications for the copyright holder's permission to reproduce any part of the publication should be addressed to the publishers.
● Declaration
The authors and publisher have used their best efforts in ensuring the correctness of the information contained in this book. They do not assume, or hereby disclaim, any liability to any party for any loss or damage caused by errors or omissions in this book, whether such errors or omissions result from negligence, accident or any other cause.
● British Library Cataloguing in Publication Data
A catalogue record for this book is available from the British Library
● ISBN 978-3-89576-612-1 Print
ISBN 978-3-89576-613-8 eBook
● © Copyright 2024 Elektor International Media www.elektor.com
Editor: Jan Buiting, MA
Prepress Production: D-Vision, Julian van den Berg
Printers: Ipskamp, Enschede, The Netherlands
Elektor is the world's leading source of essential technical information and electronics products for pro engineers, electronics designers, and the companies seeking to engage them. Each day, our international team develops and delivers high-quality content - via a variety of media channels (including magazines, video, digital media, and social media) in several languages - relating to electronics design and DIY electronics. www.elektormagazine.com
● 4
Contents ● 5 Contents Preface ........................................................... 12 Chapter 1 ● Installing the Raspberry Pi 5 Operating System ................. 14 1.1 Overview .................................................... 14 1.2 Using a pre-installed micro SD card .................................. 15 1.3 Larger font in Console mode ....................................... 16 1.4 Accessing your Raspberry Pi 5 Console from your PC – the Putty Program ....... 18 1.5 Accessing the Desktop GUI from your PC .............................. 21 1.6 Assigning a Static IP Address to your Raspberry Pi 5 . . . . . . . . . . . . . . . . . . . . . . 23 1.7 Enabling Bluetooth.............................................. 24 1.8 Connecting the Raspberry Pi 5 to a Wired Network ....................... 24 1.8.1 Unable to connect to a wired network.............................. 25 1.9 Installing the Raspberry Pi 5 Bookworm Operating System on a Blank microSD Card 26 Chapter 2 ● Using a Text editor, Creating and Running a Python Program ....... 29 2.1 The nano Text Editor 29 2.2 Creating and Running a Python Program 34 2.2.1 Method 1 — Interactively from command prompt in Console mode 34 2.3 Which method? 36 Chapter 3 ● Amateur Radio Programs – Software-Only ...................... 38 3.1 Overview 38 3.2 4-Band Resistor Color Code Identifier 38 3.3 4-Band Resistor Color Code Identifier Including Very Small Resistors ........... 40 3.4 Series or Parallel Resistors ........................................ 42 3.5 Capacitor Identification .......................................... 44 3.6 Capacitors in Series or in Parallel .................................... 46 3.7 Resistive Potential Divider......................................... 48 3.8 Resistive Attenuator Design ....................................... 51 3.9 RC Charging Transient Circuit Response ............................... 53 3.10 Calculating the Inductance of a Single-Layer, Air-Core Coil ................. 56 3.11 Constructing a single layer coil for required inductance ................... 57
Raspberry Pi 5 for Radio Amateurs ● 6 3.12 Calculating the Capacitance for Required Resonance Frequency 58 3.13 DC Circuits Mesh Analysis 60 3.13.1 DC Circuits mesh analysis — a more complex example 62 3.14 DC Circuit Node Analysis 63 3.15 Bipolar Junction Transistor Analysis 66 3.16 Designing Active Low-Pass Filters 69 3.17 Passive Low-Pass Butterworth Filter Design 74 3.18 The 555 Timer IC 77 3.19 Impedance Matching 80 3.20 Designing a Common-Emitter BJT Transistor Amplifier Circuit 83 3.21 Using a Windows-Based Simulation Program ........................... 88 3.21.1 Simulating the Resistive Mesh Circuit in Figure 3.33 ................... 89 3.21.2 Simulating the transistor circuit in Figure 3.42....................... 90 3.21.3 Simulating the transistor circuit in Figure 3.66....................... 92 Chapter 4 ● Hardware Based Projects for Amateur Radio .................... 95 4.1 Overview .................................................... 95 4.2 Project 1: Logic Probe ........................................... 95 4.3 Project 2: Station Mains On-Off Power Control .......................... 98 4.4 Project 3: Station Clock with Output to the Monitor ...................... 103 4.5 Project 4: Station Clock with Output to LCD ........................... 105 4.6 Project 5: Station Geographical Coordinates ........................... 112 4.7 Project 6: Waveform Generation in Software — Sawtooth waveform .......... 120 4.7.1 The MCP4921 DAC .......................................... 120 4.8 Project 7: Generating a Waveform – Frequency Entry using Keypad and LCD .... 126 4.8.1 The AD9850 .............................................. 127 4.8.2 Starting the program automatically at boot time . . . . . . . . . . . . . . . . . . . . . 139 4.8.3 Boxing the project .......................................... 139 4.9 Project 8: Morse Code Exerciser with Rotary Encoder and LCD to Set wpm Value . 140 4.9.1 Rotary encoder ............................................ 142 4.9.2 Boxing the project .......................................... 148 4.10 Project 9: Morse Decoder ....................................... 149
4.11
4.13
Connecting
4.14 Project
6.7
Contents ● 7
Project 10: Frequency Counter 161 4.12 Project 11: FM Radio with Raspberry Pi 5 167
. . . . . . . . . . . . . . . . . . . . . . . . . . . . . . . . . . . . . . . . . . 175
Project 12: Modified Project — Increasing the Output Signal Level –
a Loudspeaker
13: FM Radio using an LCD and Rotary Encoder to Set the Frequency ... 177 Chapter 5 ● Raspberry Pi 5 Audio Output ................................ 184 5.1 Overview ................................................... 184 5.2 Using an External USB Audio Adapter ............................... 184 5.3 Testing the Audio Output ........................................ 184 5.4 Audio Volume ................................................ 185 Chapter 6 ● RTL-SDR Meets Raspberry Pi 5 .............................. 188 6.1 Overview ................................................... 188
RTL-SDR V3 ................................................. 189
RTL-SDR V4 vs V3 ............................................. 190 6.4 The RTL-SDR Antenna Kit ........................................ 192 6.4.1. Dipole orientation .......................................... 193 6.4.2. Terrestrial signal reception .................................... 194 6.4.3. Satellite reception .......................................... 194 6.4.4. Choosing the antenna element length ............................ 194 6.5 Hardware Setup .............................................. 195
Installing the RTL-SDR Software on Raspberry Pi 5 ...................... 195
6.2
6.3
6.6
Testing — Tuning to a Frequency Manually ............................ 197 6.8 Testing the RTL-SDR Dongle ...................................... 198 Chapter 7 ● A Simple FM Receiver ..................................... 199 7.1 Overview 199 7.2 The Program 199 7.2.1 Creating a shell script 200 Chapter 8 ● GQRX on the Raspberry Pi 5 ................................ 201 8.1 Overview 201 8.2 Installation on Raspberry Pi 5 201 8.3 Using the GQRX 201 8.3.1 The audio frame 207
for Radio Amateurs ● 8 8.3.2 Streaming audio to your PC 208 Chapter 9 ● SDR++ ................................................. 210 9.1 Overview 210 9.2 Installing SDR++ on the Raspberry Pi 5 210 9.3 Using the SDR++ 211 9.3.1 Quick startup example 211 9.3.2 Graphical outputs 215 9.3.3 Source options 216 9.3.4 Display options 217 9.3.5 Radio module 218 9.3.6 Frequency Manager ......................................... 219 9.3.7 Recorder .................................................. 219 Chapter 10 ● CubicSDR .............................................. 220 10.1 Introduction to CubicSDR ....................................... 220 10.2 Quick Startup ............................................... 220 Chapter 11 ● RTL-SDR Server ......................................... 223 11.1 Overview .................................................. 223 Chapter 12 ● Dump1090 ............................................. 226 12.1 Overview .................................................. 226 12.2 Dump1090 Essential Features ................................... 226 12.3 Installing Dump1090 on the Raspberry Pi 5 .......................... 226 12.4 Launching the Dump1090 Software . . . . . . . . . . . . . . . . . . . . . . . . . . . . . . . . 227 Chapter 13 ● FLDIGI ................................................ 229 13.1 Overview .................................................. 229 13.2 Features ................................................... 229 13.3 Digital Formats .............................................. 229 13.4 Installation on Raspberry Pi 5 .................................... 230 13.5 Starting the Program .......................................... 231 13.6 Decoding Morse Code (CW) ...................................... 232 13.7 Receiving Weather Fax (WEFAX) .................................. 233 13.8 Receiving RTTY Traffic ......................................... 238
Raspberry Pi 5
Contents ● 9 13.8.1 Using fldigi to receive RTTY messages 239 13.9 Receiving NAVTEX Messages 239 13.9.1 Using fldigi to receive NAVTEX messages 240 Chapter 14 ● Quisk ................................................. 242 14.1 Overview 242 14.2 Installing quisk on the Raspberry Pi 5 242 Chapter 15 ● RTL_433 .............................................. 244 15.1 Overview 244 15.2 Installing RTL_433 on the Raspberry Pi 5 244 15.3 Program Options 245 Chapter 16 ● Other SDR hardware .................................... 246 16.1 Overview .................................................. 246 16.2 HackRF One ................................................ 246 16.3 NooElec NESDR Smart HF Bundle ................................. 247 16.4 BladeRF ................................................... 248 16.5 LimeSDR................................................... 249 16.6 Universal Software Radio Peripheral (USRP) .......................... 250 16.7 ADALM-Pluto ................................................ 250 16.8 AirSpy HF+ Discovery ......................................... 251 Chapter 17 ● Installation and Use of Some Popular Radio Applications ........ 252 17.1 Overview .................................................. 252 17.2 Aldo Morse Code Tutor – Text Based ............................... 252 17.2.1 Installing aldo on the Raspberry Pi 5 ............................ 252 17.3 xcwcp Morse Code Tutor — Graphical ............................... 252 17.3.1 Installing xcwcp on Raspberry Pi 5 .............................. 252 17.4 GPredict — Satellite/Orbital Object Tracking and Rig Control ............... 253 17.4.1 Installing GPredict on Raspberry Pi 5 ............................ 253 17.4.2 GPredict controls .......................................... 254 17.5 TWCLOCK .................................................. 262 17.5.1 Installation on Raspberry Pi 5 ................................. 262 17.5.2 Using the program ......................................... 262
for Radio Amateurs ● 10 17.6 CQRLOG 265 17.6.1 Installation on Raspberry Pi 5 265 17.6.2 Running the program 265 17.7 Klog 266 17.7.1 Installation on Raspberry Pi 5 266 17.7.2 Using the program 266 17.8 Morse2Ascii 268
Installation on Raspberry Pi 5 268 17.8.2 Using the program 268 17.9 PyQSO 269 17.9.1 Installation on Raspberry Pi 5 ................................. 269 17.9.2 Using the program ......................................... 270 17.10 Welle.io (DAB/DAB+ Radio) ..................................... 271 17.10.1 Installation on Raspberry Pi 5 ................................ 272 17.10.2 Running the program ...................................... 272 17.11 Ham Clock ................................................ 273 17.11.1 Installation on Raspberry Pi 5 ................................ 273 17.11.2 Running the program ...................................... 274 17.11.3 Accessing from a web browser ................................ 276 17.12 Chirp .................................................... 277 17.12.1 Installation on Raspberry Pi 5 ................................ 277 17.12.2 Running the program ...................................... 277 17.13 Xastir .................................................... 278 17.13.1 Installation on Raspberry Pi 5 ................................ 279 17.13.2 Running the program and configuring for internet APRS .............. 279 17.14 QSSTV ................................................... 282 17.14.1 Installation on Raspberry Pi 5 ................................ 283 17.14.2 Running the program ...................................... 283 17.14.3 Testing the program ....................................... 284 17.15 FLRIG ................................................... 285 17.15.1 Installation on Raspberry Pi 5 ................................ 286
Raspberry Pi 5
17.8.1
Contents ● 11 17.15.2 Running flrig 286 17.16 XyGrib 288 17.16.1 Installation of XyGrib on Raspberry Pi 5 288 1 7.16.2 Running XyGrib 289 17.17 FreeDV 291 17.17.1 Installation on Raspberry Pi 5 292 17.7.2 Running FreeDV 292 17.18 Qtel (EchoLink) 293 17.18.1 Qtel installation on Raspberry Pi 293 17.18.2 Running the program 293 17.18.3 Using EchoLink on smart phones .............................. 294 17.19 XDX (DX-Cluster) ............................................ 297 17.19.1 Installation on Raspberry Pi 5 ................................ 297 17.19.2 Running the program ...................................... 297 17.20 WSJT-X ................................................... 298 17.20.1 Installation on Raspberry Pi 5 ................................ 298 17.20.2 Running the program ........................................ 298 Index ........................................................... 300
Raspberry Pi 5 for Radio Amateurs
Preface
In recent years there have been major changes in the radio equipment used by the radio amateurs. Although the classical HF and mobile equipment is still in use by large numbers of amateurs, computers and digital techniques are becoming very popular among amateur radio operators or 'hams'. In early days of digital communications, personal computers were used by hams to communicate with each other. PCs have the disadvantage that they are rather expensive and bulky. Nowadays, anyone can purchase a £40 Raspberry Pi computer and run almost all of the amateur radio software on this computer, which is slightly bigger than the size of a credit card.
The Raspberry Pi 5 is the latest credit-card sized computer from the Raspberry Pi Foundation that can be used in many applications, such as in audio and video media centers, as a desktop computer, in industrial controllers, robotics, and in many domestic and commercial applications. In addition to many features found in other Raspberry Pi computers, the Raspberry Pi 5 offers Wi-Fi, Classic Bluetooth, and Bluetooth BLE capability which makes it highly desirable in remote and Internet-based control and monitoring applications.
The Raspberry Pi 5 is a 64-bit quad-core Arm Cortex-A76 processor running at 2.4 GHz, which is two to three times the performance boost when compared to the earlier Raspberry Pi 4. The Raspberry Pi 5 comes with an enhanced graphic performance, using the 800MHz VideoCore VII graphics chip. Additionally, the Raspberry Pi 5 features a Southbridge chipset made for the first time by the Raspberry Pi Foundation. With the help of this RP1 Southbridge, the Raspberry Pi 5 delivers higher performance and functionality for peripheral devices. It should now be possible to carry out many real-time operations such as audio digital signal processing, real-time digital control and monitoring, and many other real-time operations using this tiny powerhouse.
The RTL-SDR devices (V3 and V4 dongles) have become very popular among radio fans because of their very low cost (some around £12) and rich features. A basic system may consist of a USB-based RTL-SDR device (dongle) with a suitable antenna, a Raspberry Pi 5 computer, an USB-based external audio input/output adapter, and software installed on the Raspberry Pi 5 computer. With such a simple setup, it is possible to receive signals from around 24 MHz to over 1.7 GHz.
This book has four purposes. Firstly, it is aimed to teach the installation of the operating system and basic operating principles and features of the Raspberry Pi 5 to beginners. Secondly, many hardware-based projects are given using the Raspberry Pi 5 together with the Python programming language. These projects have been chosen to be useful to amateur radio operators. Thirdly, the book explains in some detail how to use the RTL-SDR devices (both V3 and V4) together with a Raspberry Pi 5 and popular RTL-SDR software to tune in and receive signals from a wide range of ham and other frequency bands. Lastly, the book also explains how to install and use some of the popular amateur radio software packages on the Raspberry Pi 5.
● 12
It is important to realize that the book uses the Python programming language on the latest Raspberry Pi 5 platform, and most of the programs in the book will not work on older versions of Raspberry Pi computers. Readers interested in exploring older Raspberry Pi models in amateur radio projects are recommended to purchase author's earlier book entitled: Raspberry Pi for Radio Amateurs: Program and build RPI-based ham station utilities, tools, and instruments (available from Elektor).
I hope you enjoy reading the book.
Dogan Ibrahim, G7SCU and Ahmet Ibrahim, 2E1GUC London, 2024Preface ● 13
Chapter 1 ● Installing the Raspberry Pi 5 Operating System
1.1 Overview
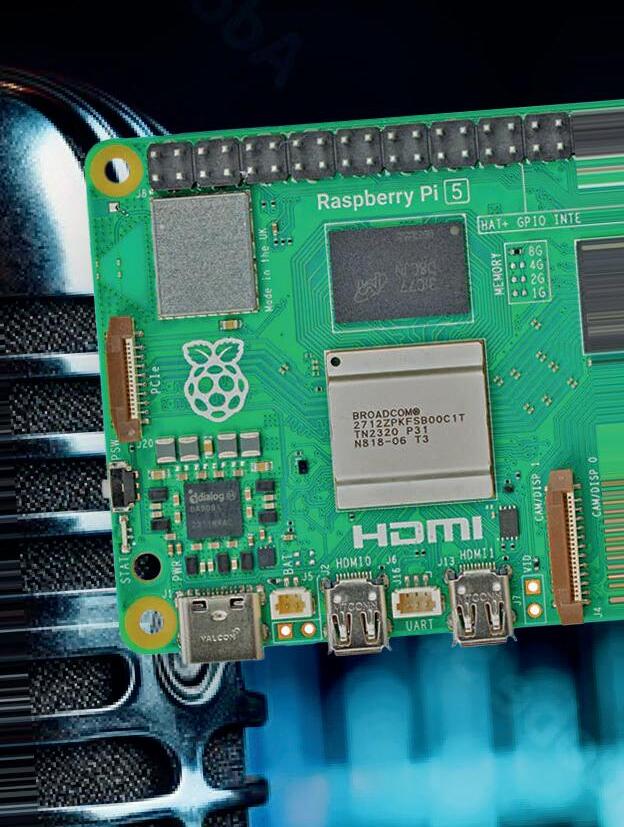
The Raspberry Pi 5 is the latest credit card size computer from the Raspberry Pi Foundation. It is based on 2.4-GHz Cortex-A76 Arm processor with a new Southgate bridge for handling the peripheral interface. A new VideoCore VII GPU is provided with 800 MHz speed. A dual camera interface is another nice feature of the Raspberry Pi 5. The microSD card interface supports cards that work at much higher speeds than previously.
The Raspberry Pi 5 is similar to the older Raspberry Pi 4, where both devices have dual 2 4Kp60 HDMI display interfaces, although the Pi 5 supports HDR output. The 2×20-pin GPIO interface is the same in both devices. The Raspberry Pi 5 additionally supports two camera interfaces, a PCIe bus connector, a UART interface, an RTC clock power connector, and a fan power connector. Wi-Fi and Bluetooth are supported by both devices. The on-board power switch on the Raspberry Pi 5 is a useful feature. The Raspberry Pi 5 is powered from a 5 V, 4 A USB-C type power supply and is slightly more expensive than the Raspberry Pi 4.
The camera and display connectors on Raspberry Pi 5 are 15-pin and smaller instead of the original 22-pin connector used on Pi 4. A ribbon cable with a 22-pin connector on one side and a 15-pin one on the other side is required to connect an existing Raspberry Pi 4 camera to Raspberry Pi 5. The Raspberry Pi 5 has two connectors, allowing two cameras or DSI displays (or a mix of ) to be connected. The PCIe connector is for fast external PCIe compatible peripherals, such as SSDs.
The new power button on Raspberry Pi 5 could be very useful. When the device is ON, pressing the button brings up the shutdown (logout) menu. A safe shutdown will occur with another press of the power button.
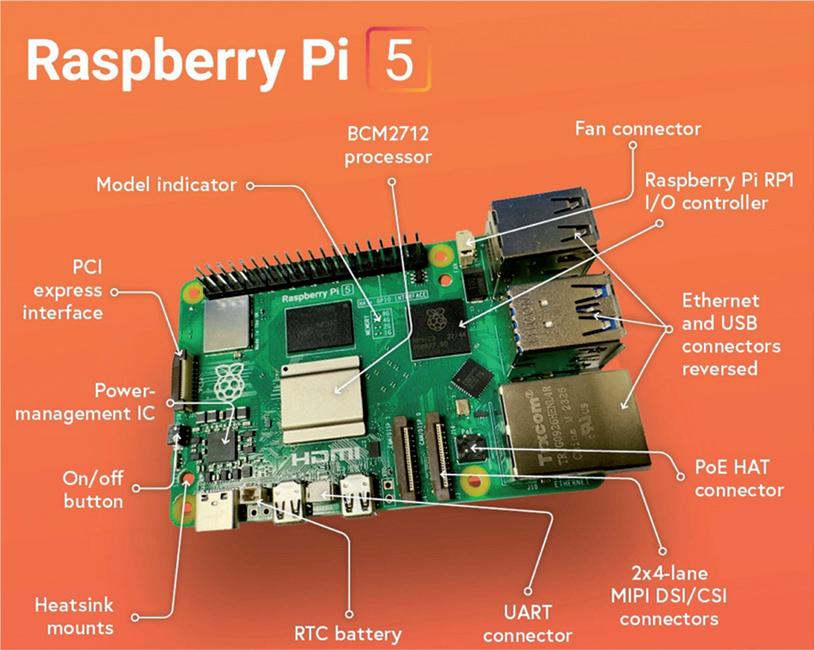
Figure 1.1 shows the front view of the Raspberry Pi 5 with the components labelled for reference.
Raspberry Pi 5 for Radio Amateurs ● 14
Figure 1.1: The Raspberry Pi 5.
The Raspberry Pi 5 can get very hot when working. While the 'idle' CPU temperature is around 50 degrees Celsius, it can go higher than 85 degrees under stress. It is recommended to use a cooler to lower the CPU temperature. A dedicated active cooler is available for Raspberry Pi 5. Holes and power points are provided on the board to install and power the active cooler. Figure 1.2 shows the Raspberry Pi 5 with the active cooler installed. The active cooler cools down the on-board SoC, RAM, and the Southgate chipset. With the active cooler and when the CPU is idle, the CPU temperature is around 40 degrees. The fan of the cooler operates automatically when the CPU temperature just exceeds 50 degrees Celsius.
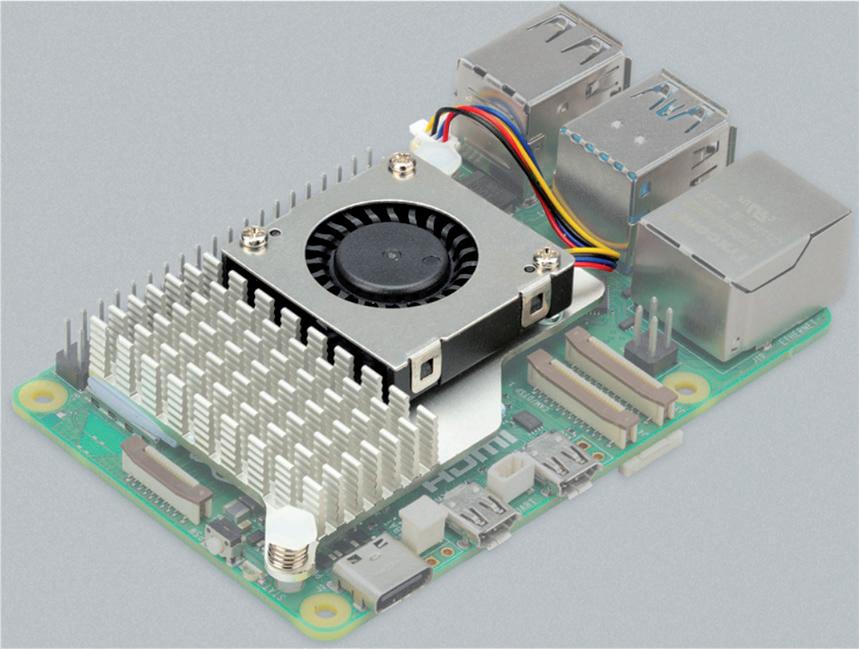
Figure 1.2: Raspberry Pi 5 with active cooler.
The Raspberry Pi 5 operating system called Bookworm is available either on a pre-installed micro SD card or by downloading the system image onto a blank micro SD card. In this chapter, you will learn to install the operating system using both methods.
1.2 Using a pre-installed micro SD card
The pre-installed Raspberry Pi 5 operating system is available in various size micro SD cards. The author used the pre-installed 32 GB micro SD card supplied by Elektor. Additionally, the author used a 7-inch HDMI compatible monitor, a Raspberry Pi official keyboard, and a mouse. The author's hardware setup between the Raspberry Pi 5 and various devices is shown in Figure 1.3.
Chapter
Installing the
Operating System ● 15
1 ●
Raspberry Pi 5
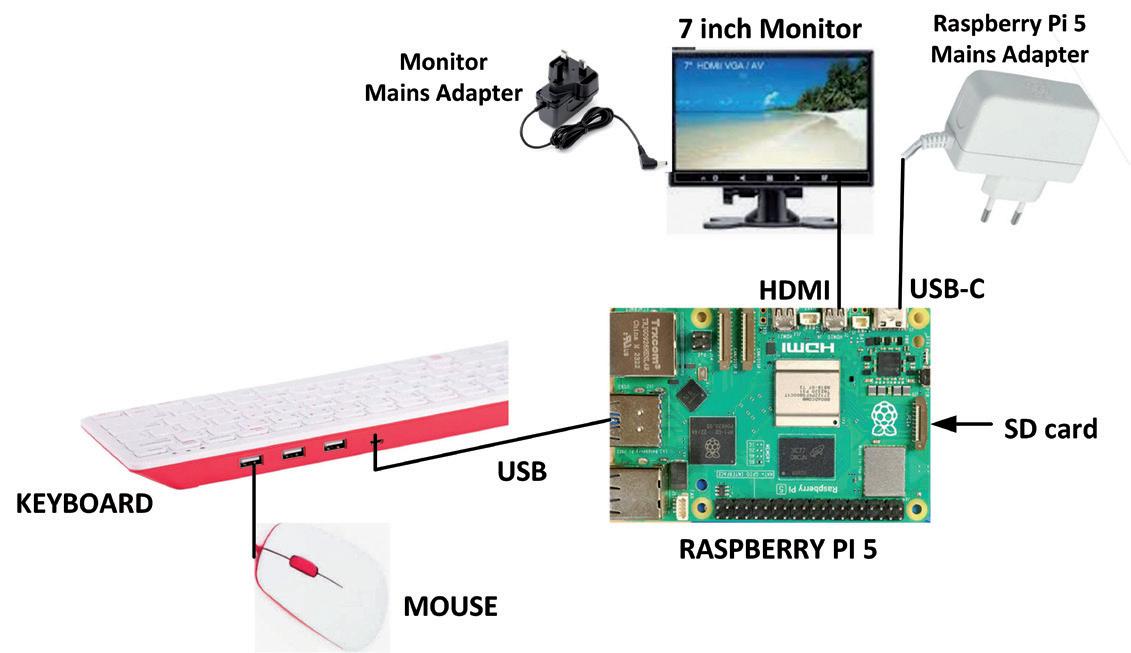
Figure 1.3: The authors' hardware setup.
The steps are as follows:
• Insert the pre-installed micro SD card into your Raspberry Pi 5.
• Connect all the devices as in Figure 1.3.
• Connect the Raspberry Pi 5 adapter to the mains (AC power).
• You should see the Raspberry Pi 5 booting the first time and asking you various questions to setup the device, such as the username, password, WiFi name and password, any updates if necessary, etc. etc. In this book, the username is set to pi
• The Raspberry Pi 5 will boot in Desktop mode and will display the default screen. You can press Cntrl+Alt+F1 at any time to change to the Console mode.
1.3 Larger font in Console mode
It is probably hard to see the characters on a 7-inch monitor in Console mode. You can follow the steps below to increase the font size:
• Make sure you are in the Console mode
• Enter the following command:
pi@raspberrypi: ~ $ sudo dpkg-reconfigure console-setup
• Select UTF-8 in the Package Configuration screen (Figure 1.4)
Raspberry Pi 5 for Radio Amateurs ● 16

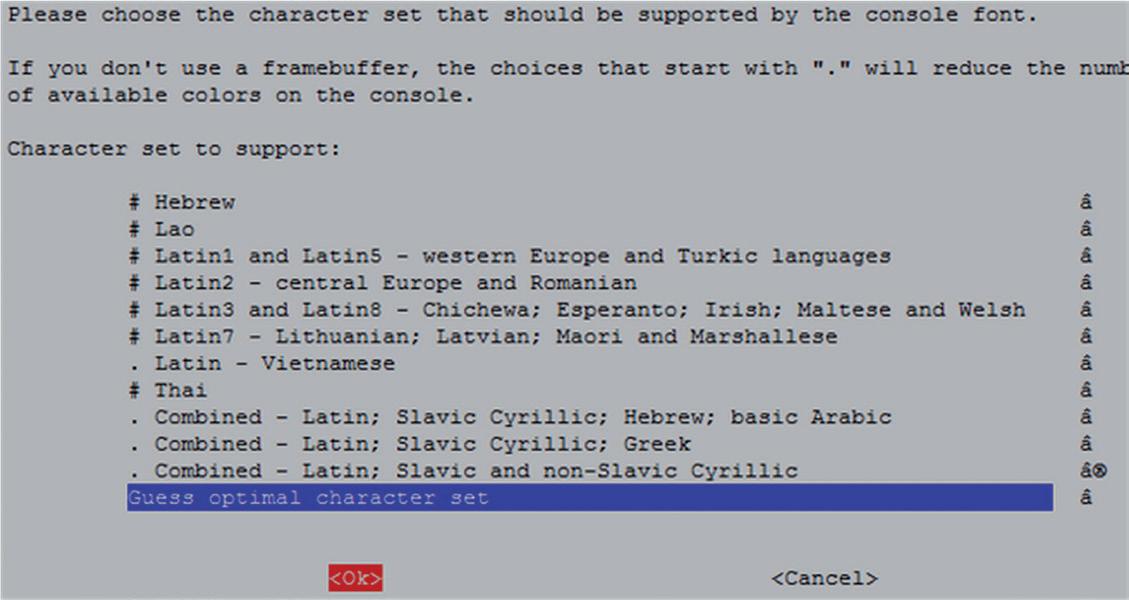
• Select Guess optimal character set (Figure 1.5)
• Select Terminus (Figure 1.6)
Chapter 1 ● Installing the Raspberry Pi 5 Operating System ● 17
Figure 1.4: Select UTF-8.
Figure 1.5: Select Guess optimal character set.
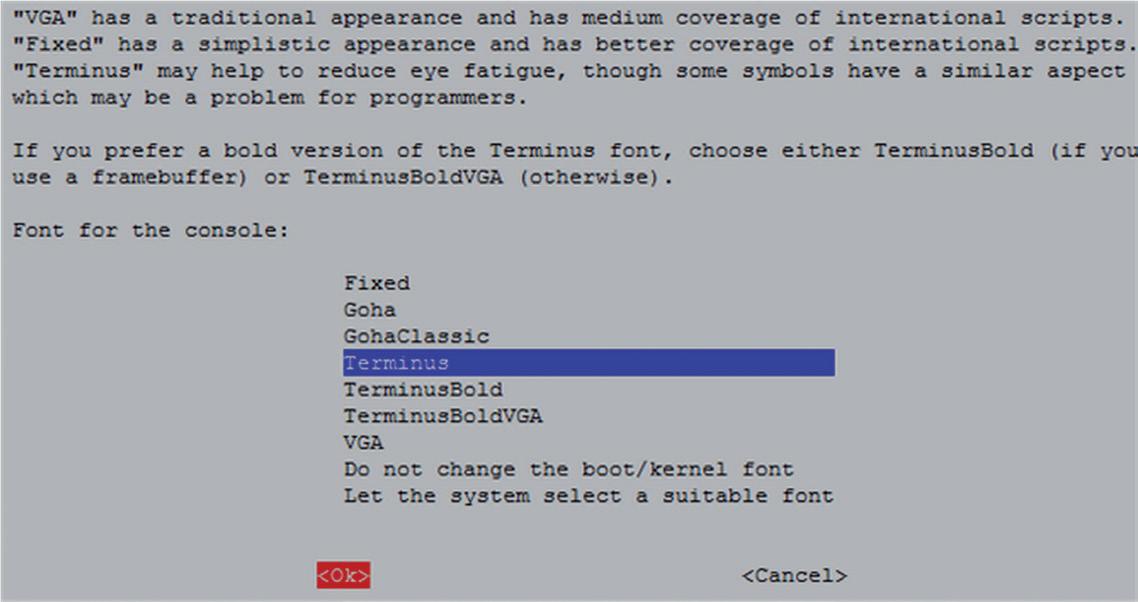
1.6: Select Terminus.
• Select font 16x32 (Figure 1.7)
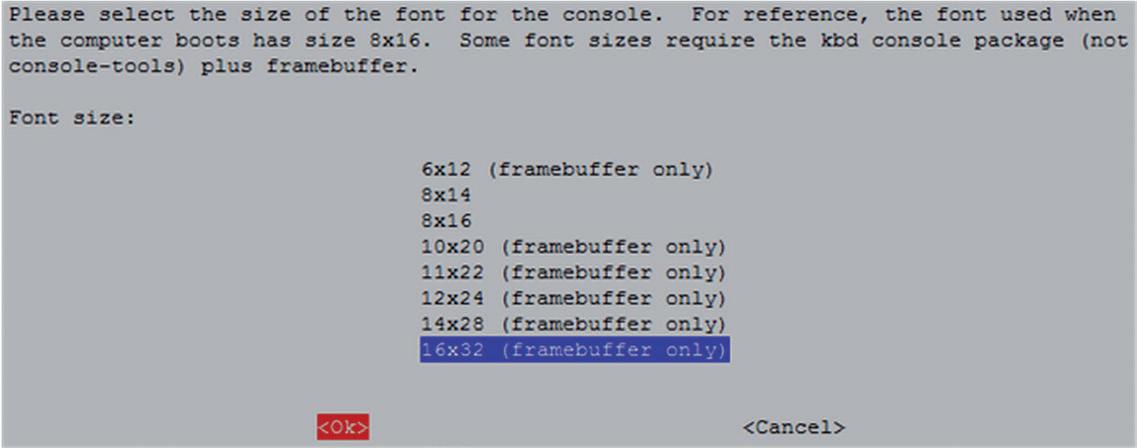
1.7: Select font 16×32.
1.4 Accessing your Raspberry Pi 5 Console from your PC – the Putty Program
In many applications, you may want to access your Raspberry Pi 5 from your PC. This requires enabling the SSH on your Raspberry Pi and then using a terminal emulation software on your PC. The steps to enable the SSH are as follows:
• Make sure you are in Console mode.
• Type: sudo raspi-config.
• Move down to Interface Options
• Highlight SSH and press Enter (Figure 1.8).
Raspberry Pi 5 for Radio Amateurs ● 18
Figure
Figure
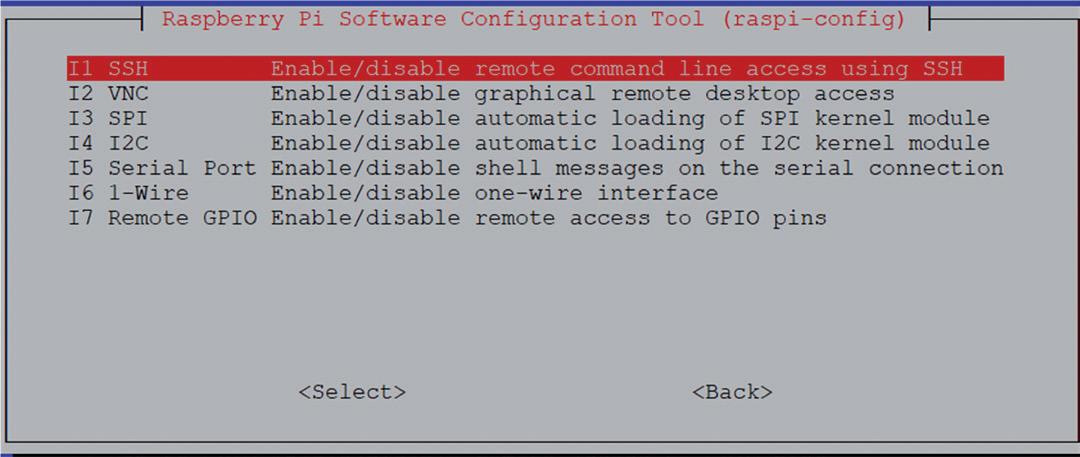
1.8: Highlight SSH.
• Click Yes to enable SSH.
• Click OK.
• Move down and click Finish
You will now have to install a terminal emulation software on your PC. The one used by the authors is the popular 'Putty'. Download Putty from the following web site: https://www.putty.org
• Putty is a standalone program and there is no need to install it. Simply double click to run it. You should see the Putty startup screen as in Figure 1.9.

Figure 1.9: Putty startup screen.
• Make sure that the Connection type is SSH and enter the IP address of your Raspberry Pi 5. You can obtain the IP address by entering the command ifconfig in Console mode (Figure 1.10). In this example, the IP address was: 191.168.1.251 (see under wlan0:)
● 19
Figure
Installing the Raspberry Pi 5 Operating System
Chapter 1 ●

1.10: Command ifconfig.
• Click Open in Putty after entering the IP address and selecting SSH.
• The first time you run Putty you may get a security message. Click Yes to accept this security alert.
• You will then be prompted to enter the Raspberry Pi 5 username and password. You can now enter all Console based commands through your PC.
• To change your password, enter the following command:
pi@raspberrypi: ~ $ passwd
• To restart the Raspberry Pi enter the following command:
pi@raspberrypi: ~ $ sudo reboot
• To shut down the Raspberry Pi, enter the following command. By the way, never shut down by pulling the power cable as this may result in the corruption or loss of files!
pi@raspberrypi: ~ $ sudo shutdown –h now
By default, the Putty screen background is black with white foreground characters. The authors prefer to have white background with black foreground characters, with the character size set to 12 points bold. You should save your settings so that they are available next time you want to use the Putty. The steps to configure the Putty with these settings are given below:
• Restart Putty.
• Select SSH and enter the Raspberry Pi IP address.
Raspberry Pi 5 for Radio Amateurs ● 20
Figure
• Click Colours under Window.
• Set the Default Foreground and Default Bold Foreground colours to black (Red:0, Green:0, Blue:0).
• Set the Default Background and Default Bold Background to white (Red:255, Green:255, Blue:255).
• Set the Cursor Text and Cursor Colour to black (Red:0, Green:0, Blue:0).
• Select Appearance under Window and click Change in Font settings. Set the font to Bold 11.
• Select Session and give a name to the session (e.g. MyZero) and click Save.
• Click Open to open the Putty session with the saved configuration.
• Next time you re-start the Putty, select the saved session and click Load followed by Open to start a session with the saved configuration.
1.5 Accessing the Desktop GUI from your PC
If you are using your Raspberry Pi 5 with a local keyboard, mouse, and display you can skip this section. If, on the other hand, you want to access your Desktop remotely over the network, you will find that SSH services cannot be used. The easiest and simplest way to access your Desktop remotely from a computer is by using the VNC (Virtual Network Connection) client and server. The VNC server runs on your Pi and the VNC client runs on your computer. It is recommended to use the tightvncserver on your Raspberry Pi 5. The steps are:
• Enter the following command:
pi$raspberrypi:~ $ sudo apt-get install tightvncserver
• Run the tightvncserver:
pi$raspberrypi:~ $ tightvncserver
You will be prompted to create a password for remotely accessing the Raspberry Pi desktop. You can also set-up an optional read-only password. The password should be entered every time you want to access the Desktop. Enter a password and remember it.
• Start the VNC server after reboot by the following command:
pi$raspberrypi:~ $ vncserver :1
Chapter 1 ● Installing the Raspberry Pi 5 Operating System ● 21
You can optionally specify screen pixel size and colour depth in bits as follows:
pi$raspberrypi:~ $ vncserver :1 –geometry 1920x1080 –depth 24
• You should now set up a VNC viewer on our laptop (or desktop) PC. There are many VNC clients available, but the recommended one which is compatible with TightVNC is the TightVNC for the PC which can be downloaded from the following link:
https://www.tightvnc.com/download.php
• Download and install the TightVNC software for your PC. You will have to choose a password during the installation.
• Start the TightVNC Viewer on your PC and enter the Raspberry Pi IP address followed by :1. Click Connect to connect to your Raspberry Pi (Figure 1.11)

Figure 1.11: Connect to TightVNC Viewer.
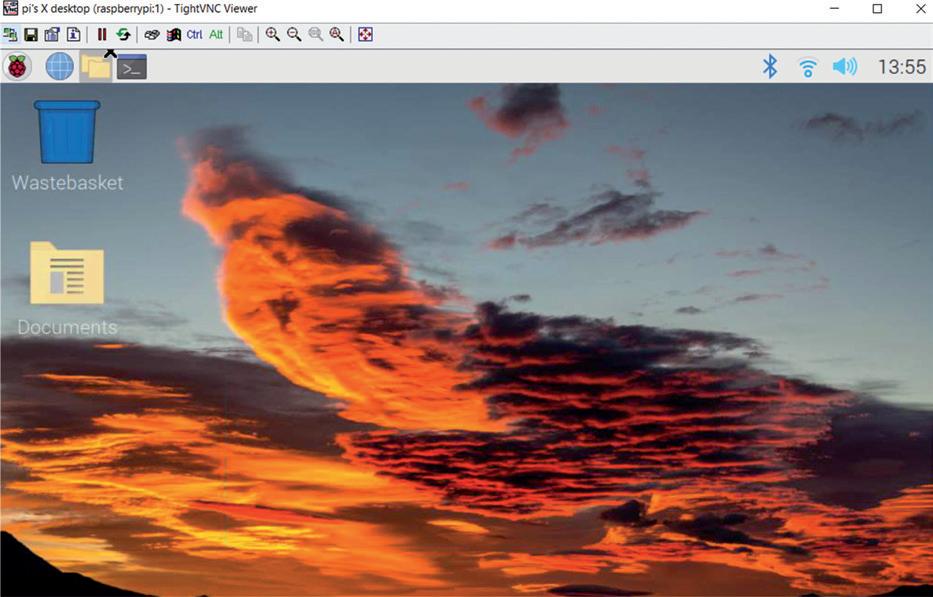
• Enter the password you have chosen earlier. You should now see the Raspberry Pi 5 Desktop displayed on your PC screen (Figure 1.12)
Raspberry Pi 5 for Radio Amateurs ● 22
Figure 1.12: Raspberry Pi 5 Desktop.
• The VNC server is now running on your Raspberry Pi 5 and you have access to the Desktop GUI.
1.6 Assigning a Static IP Address to your Raspberry Pi 5
When you try to access your Raspberry Pi 5 remotely over your local network, it is possible that the IP address given by your Wi-Fi router changes from time to time. This is annoying as you have to find out the new IP address allocated to your Raspberry Pi. Without knowing the IP address, you cannot log in using the SSH or the VNC.
In this section, you will learn how to fix your IP address so that it does not change between reboots. The steps are as follows:
• Log in to your Raspberry Pi 5 via Putty.
• Check whether DHCP is active on your Raspberry Pi (it should normally be active):
pi@raspberrypi:~ $ sudo service dhcpcd status
If DHCP is not active, activate it by entering the following commands:
pi@raspberrypi:~ $ sudo service dhcpcd start
pi@raspberrypi:~ $ sudo systemctl enable dhcpcd
• Find the IP address currently allocated to you by entering command ifconfig or hostname – I (Figure 1.13). In this example the IP address was: 191.168.1.251. You can use this IP address as your fixed address since no other device on the network is currently using it.
Figure 1.13: Find the IP address using command hostname -I.
• Find the IP address of your router by entering the command ip r (Figure 1.14). In this example, the IP address was: 191.168.1.254.
Figure 1.14: Find the IP address of your router.
• Find the IP address of your DNS by entering the following command (Figure 1.15). This is usually same as your router address:
pi@raspberrypi:~ $ grep "nameserver" /etc/resolv.conf
Chapter
● Installing the Raspberry Pi 5 Operating System ● 23
1

Figure 1.15: Find the DNS address.
• Edit file /etc/dhcpcd.conf by entering the command:
pi@raspberrypi:~ $ nano /etc/dhcpcd.conf
• Add the following lines to the bottom of the file (these will be different for your router). If these lines already exist, remove the comment character # at the beginning of the lines and change the lines as follows (you may notice that eth0 for Ethernet is listed):
interface wlan0
static_routers=191.168.1.254
static domain_name_servers=191.168.1.254
static ip_address=191.168.1.251/24
• Save the file by entering CNTRL + X followed by Y and reboot your Raspberry Pi.
• In this example, the Raspberry Pi should reboot with the static IP address: 191.168.1.251.
1.7 Enabling Bluetooth
In this section, you will see how to enable the Bluetooth on your Raspberry Pi 5 so that it can communicate with other Bluetooth devices. The steps are given below:
• Enable the Bluetooth on your other device.
• Click on the Bluetooth icon on your Raspberry Pi 5 at the top right hand side and select Make Discoverable. You should see the Bluetooth icon flashing.
• Select raspberrypi in the Bluetooth menu on your other device.
• Accept the pairing request on your Raspberry Pi 5.
• You should now see the message Connected Successfully on your Raspberry Pi 5. and you can exchange files between your other device and the Raspberry Pi computer.
1.8 Connecting the Raspberry Pi 5 to a Wired Network
You may want to connect your Raspberry Pi 5 to a network through an Ethernet cable. The steps are as follows:
Step 1: Connect a network cable between your Raspberry Pi 5 and your WiFi router.
Raspberry Pi 5 for Radio Amateurs ● 24
Step 2: Connect keyboard, mouse and monitor to your Raspberry Pi and power up as normal.
Step 3: Log in to the system by entering your username and password.
Step 4: Providing your network hub supports DHCP (nearly all network routers support DHCP), you will be connected automatically to the network and will be assigned a unique IP address within your network. Note that DHCP assigns IP addresses to newly connected devices.
Step 5: Check to find out the IP address assigned to your Raspberry Pi 5 by the network router. Enter command ifconfig as described earlier.
1.8.1 Unable to connect to a wired network
If you find that you are not assigned an IP address by the DHCP, the possible causes are:
• your network cable is faulty;
• the network hub does not support DHCP;
• your Raspberry Pi is not enabled to accept DHCP issued addresses. i.e. it may have been configured for fixed IP addresses.
In most cases it is very unlikely that the network cable is faulty. Also, most network hubs support the DHCP protocol. If you are having problems with the network, it is possible that your Raspberry Pi is not configured to accept DHCP issued addresses. The Raspberry Pi is normally configured to accept DHCP addresses but it is possible that you have changed the configuration somehow.
To resolve the wired network connectivity problem, follow the steps given below.
Step 1: find out whether or not your Raspberry Pi is configured for DHCP or fixed IP addresses. Enter the following command:
pi@raspberrypi ~$ cat /etc/network/interfaces
If your Raspberry Pi is configured to use the DHCP protocol (which is normally the default configuration), the word dhcp should appear at the end of the following line:
iface eth0 inet dhcp
If on the other hand your Raspberry Pi is configured to use static addresses then you should see the word static at the end of the following line:
iface eth0 inet static
Chapter 1 ● Installing the Raspberry Pi 5 Operating System ● 25
Step 2: To use the DHCP protocol, edit file interfaces (e.g. using the nano text editor) and change the word static to dhcp. It is recommended to make a backup copy of the file interfaces before you change it:
pi@raspberrypi ~$ sudo cp /etc/network/interfaces /etc/network/int.bac
You should now restart your Raspberry Pi and an IP address will probably be assigned to your device.
Step 3: To use static addressing, make sure that the word static appears as shown above. If not, edit file interfaces and change dhcp to static
Step 4: You need to edit and add the required unique IP address, subnet mask and gateway addresses to file interfaces as in the following example (this example assumes that the required fixed IP address is 191.168.1.251, the subnet mask used in the network is 255.255.255.0, and the gateway address is 191.168.1.1):
iface eth0 inet static address 191.168.1.251 netmask 255.255.255.0 gateway 191.168.1.1
Save the changes and exit the editor. If you are using the nano editor, exit by pressing Ctrl+X, and then enter Y to save the changes, and enter the filename to write to as /etc/ network/interfaces.
Re-start your Raspberry Pi 5.
1.9 Installing the Raspberry Pi 5 Bookworm Operating System on a Blank microSD Card
If you have a pre-installed 'Bookworm' Raspberry Pi operating system on a microSD card then you can start using it as described earlier in this chapter. In this section, you will learn how to install the latest Bookworm operating system on a microSD card if you do not have a pre-installed card.
The steps are as follows:
• Insert a microSD card into your PC. You may need to use an SD card adapter.
• Go to the website: https://www.raspberrypi.com/software/
• Click to download the Raspberry Pi Imager. At the time of writing this book this file was called: imager_1.7.5.exe.
• Double click to start the imager program and click to install it.
Raspberry Pi 5 for Radio Amateurs ● 26
• Click to Finish to run the imager.
• Click Operating System and select the operating system at the top of the list as: Raspberry Pi OS (64-bit). See Figure 1.16.
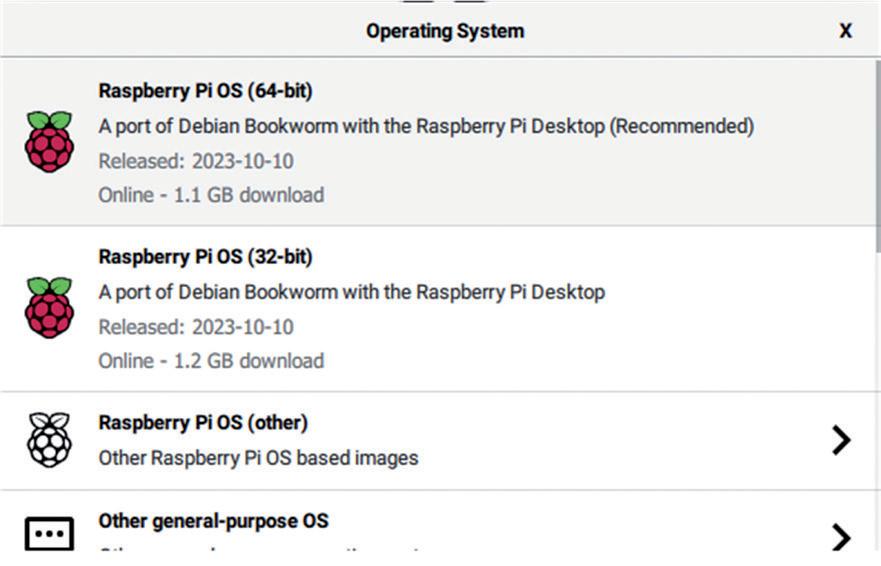
Figure 1.16: Select the operating system.
• Click Storage and select the SD card storage.
• Click to open the settings (gear shape).
• Click to enable SSH.
• Click to enable password authentication.
• Set username and password.
• Click to Configure wireless LAN
• Click Save.
• Click Write to write the operating system to the microSD card.
• Wait until writing and verifying are finished (Figure 1.17).
• Remove the microSD card and insert into your Raspberry Pi 5.
Chapter
Installing the
Operating
● 27
1 ●
Raspberry Pi 5
System

If you have a monitor and keyboard, you can log in to your raspberry Pi 5 directly and start using it. Otherwise, find the IP address of your Raspberry Pi 5 (e.g., from your router, or there are many apps for smartphones, such as who's on my wifi, showing all the devices connected to your router with their IP addresses). Then log in to your Raspberry Pi 5 and start using it.
Raspberry Pi 5 for Radio Amateurs ● 28
Figure 1.17: Writing to the micro SD card.
Chapter 2 ● Using a Text editor, Creating and Running a Python Program
A text editor is used to create or modify the contents of a text file. There are many text editors available for the Linux operating system. Some popular ones are nano, vim, vi, and many more. In this Chapter, you will be learning how to use the popular text editor called nano. Additionally, you will be learning the different methods of creating and running a Python program.
2.1 The nano Text Editor
This is probably the most commonly used text editor. Start the nano text editor by entering the word nano, followed by the filename you wish to create or modify. An example is given below, where a new file called first.txt is created:
pi@raspberrypi: ~ $ nano first.txt
You should see the editor screen as in Figure 2.1. The name of the file to be created or modified is displayed at the top middle part of the screen. The message New File at the bottom of the screen shows that this is a newly created file. The shortcuts at the bottom of the screen are there to perform various editing functions. These shortcuts are accessed by pressing the Ctrl key together with another key. Some of the useful shortcuts are described below:
Ctrl+W: Search for a word.
Ctrl+V: Move to next page.
Ctrl+Y: Move to previous page.
Ctrl+K: Cut the current row of txt.
Ctrl+R: Read file.
Ctrl+U: Paste the text you previously cut.
Ctrl+J: Justify.
Ctrl+\: Search and replace text.
Ctrl+C: Display current column and row position.
Ctrl+G: Get detailed help on using nano.
Ctrl+-: Go to specified line and column position.
Ctrl+O: Save (write out) the file currently open.
Ctrl+X: Exit nano.
Chapter
Using a Text editor, Creating and Running a Python Program ● 29
2 ●

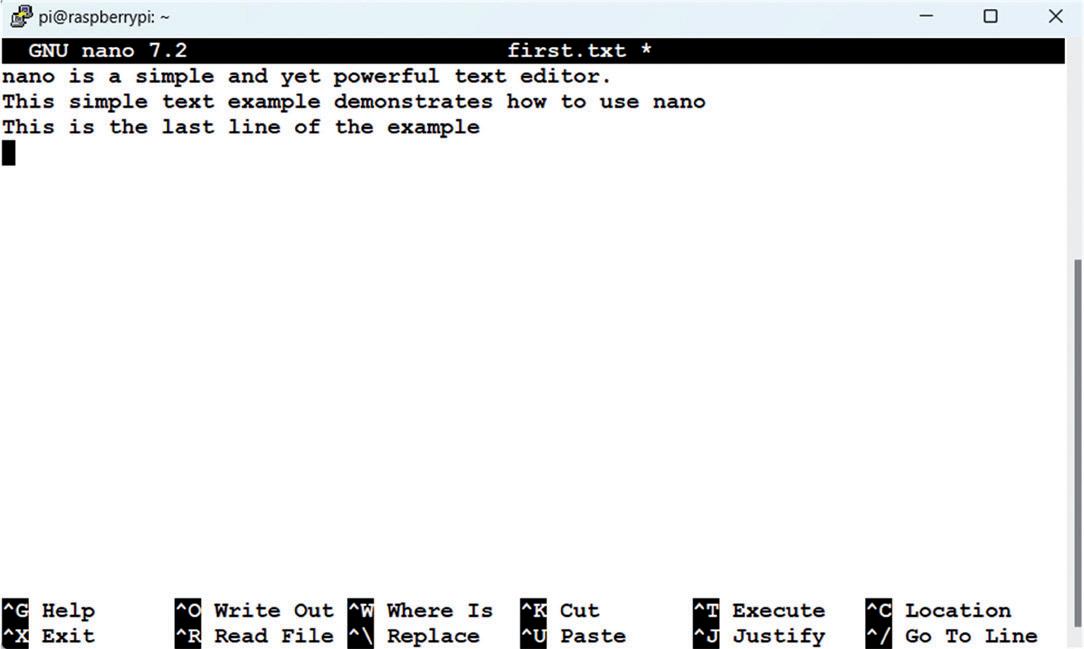
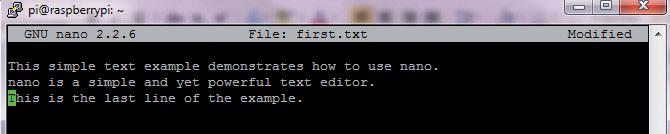
Now, type the following text as shown in Figure 2.2: nano is a simple and yet powerful text editor. This simple text example demonstrates how to use nano. This is the last line of the example.
The use of nano is now demonstrated with the following steps.
Step 1: Go the beginning of the file by moving the cursor up and left.
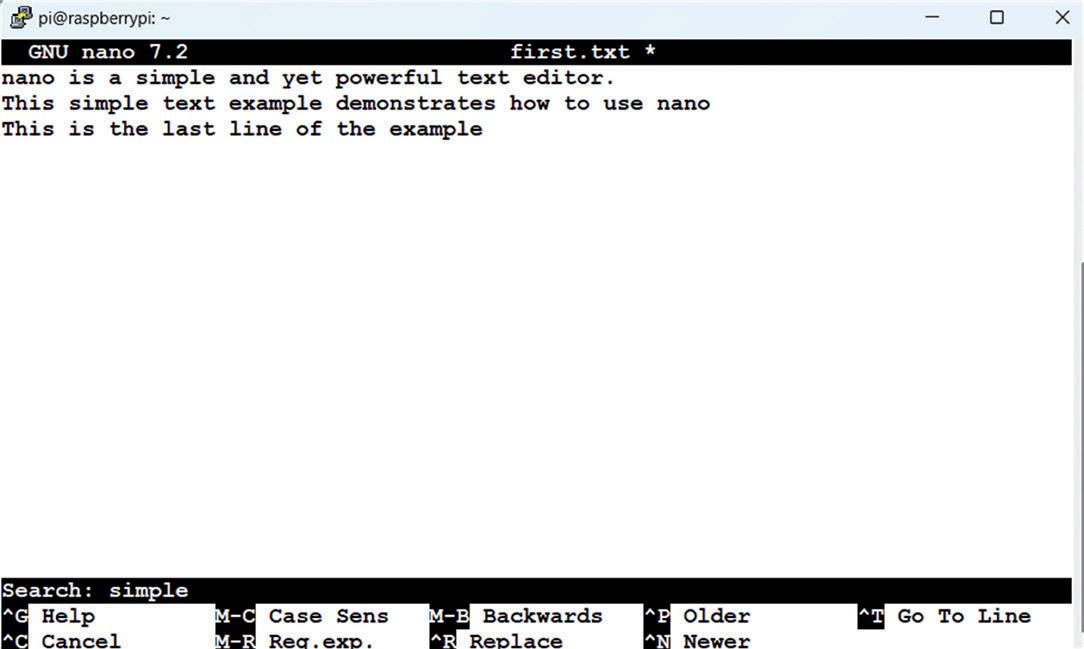
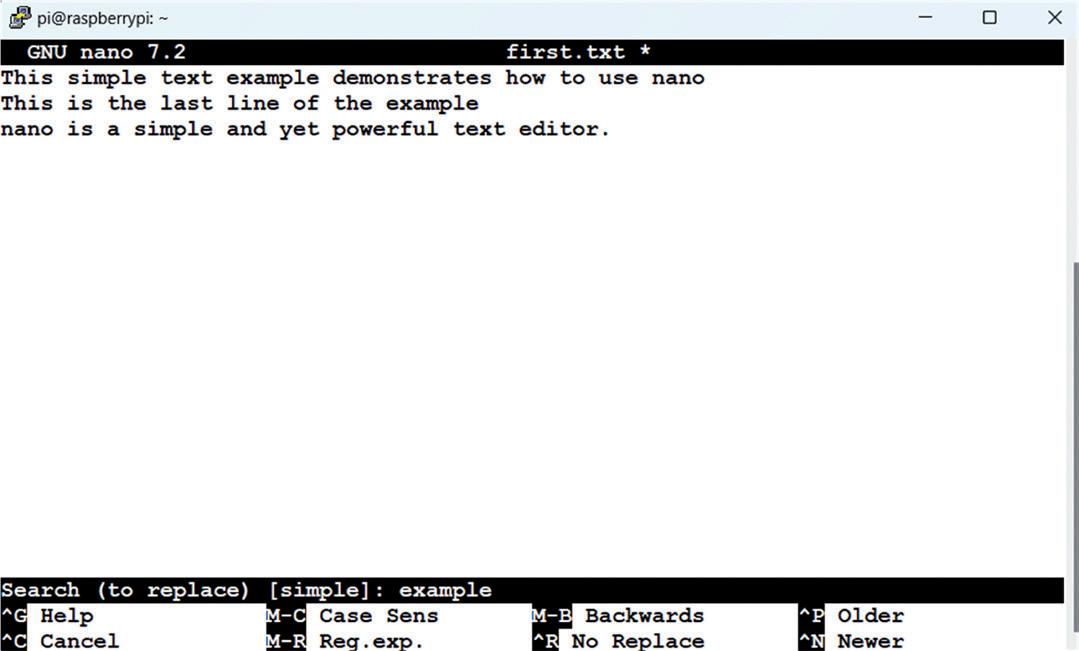
Step 2: Look for word simple by pressing Ctrl+W and then typing simple in the window opened at the bottom left hand corner of the screen. Press the Enter key. The cursor will be positioned on the word simple (see Figure 2.3).
Raspberry Pi 5 for Radio Amateurs ● 30
Figure 2.1: nano text editor screen.
Figure 2.2: Sample text.
Chapter 2 ● Using a Text editor, Creating and Running a Python Program
Step 3: Cut the first line by placing the cursor anywhere on the line and then pressing Ctrl+K. The first line will disappear as in Figure 2.4.

2.4: Cutting the first line.
Step 4: Paste the line cut after the second line. Place the cursor on the third line and press Ctrl+U (see Figure 2.5).
2.5: Paste the line cut previously.
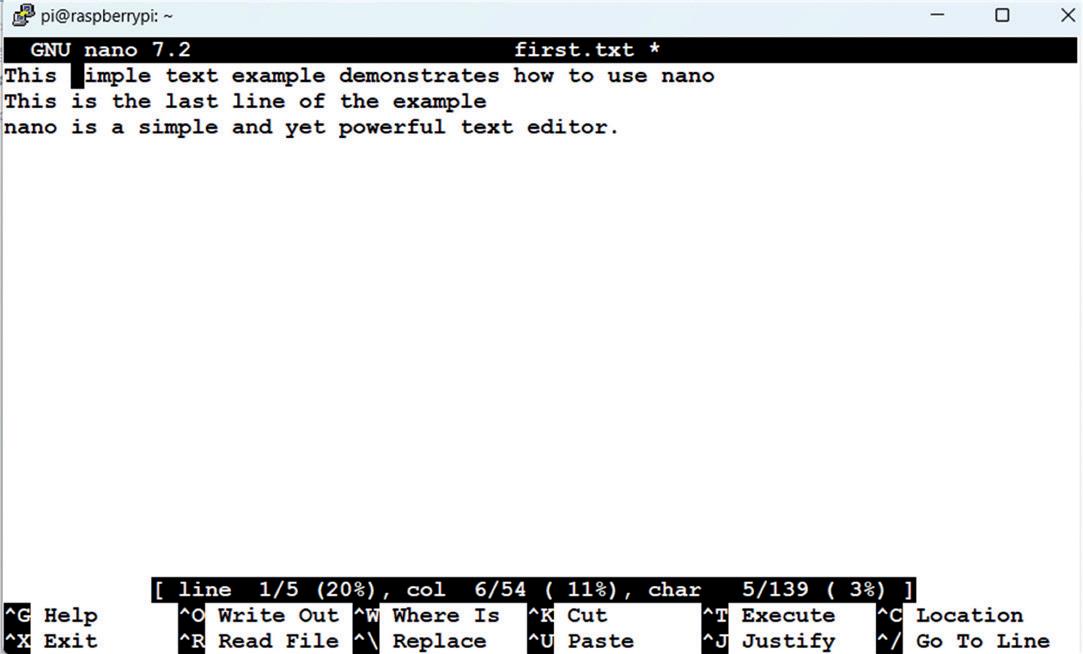
Step 5: Place cursor at the beginning of word simple on the first line. Enter Ctrl+C. The row and column positions of this word will be displayed at the bottom of the screen (Figure 2.6).
● 31
Figure 2.3: Searching the word 'simple'.
Figure
Figure
Step 6: Press Ctrl+G to display help page as in Figure 2.7. Notice that the display is many pages long and you can jump to the next pages by pressing Ctrl+Y or to the previous pages by pressing Ctrl+V. Press Ctrl+X to exit the help page.

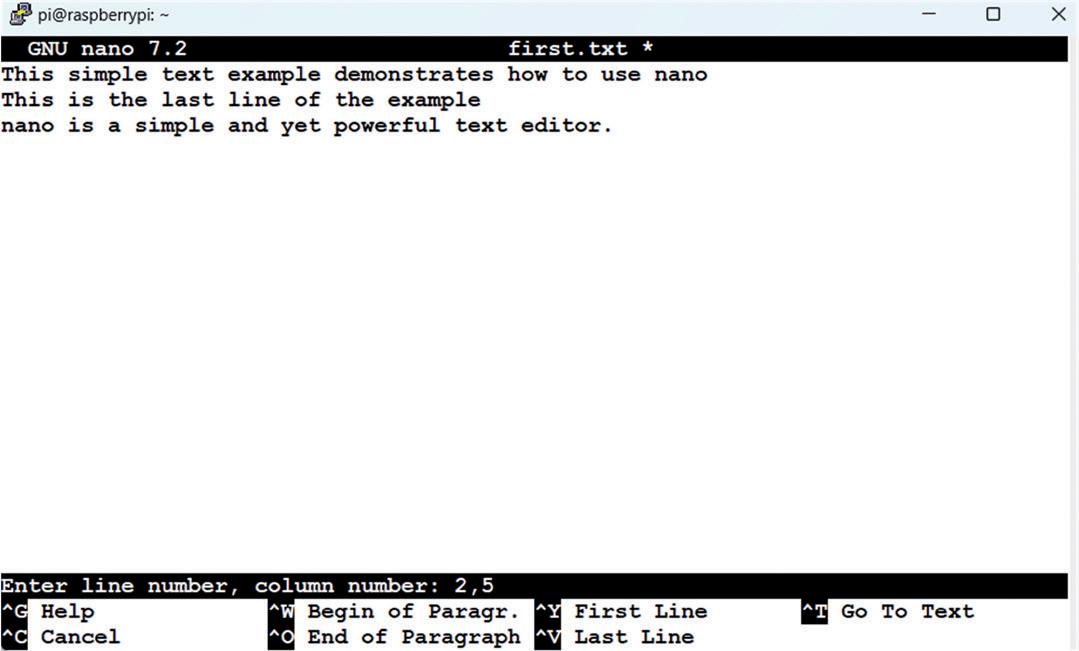
Step 7: Press Ctrl+- and enter line and column numbers as 2 and 5, followed by the Enter key, to move cursor to line 2, column 5 (Figure 2.8).
Raspberry Pi 5 for Radio Amateurs ● 32
Figure 2.6: Displaying row and column position of a word.
Figure 2.7: Displaying the Help page.
Step 8: Replace word example with word file. Press Ctrl+\ and type the first word as example (see Figure 2.9). Press Enter and then type the replacement word as file. Press Enter and accept the change by typing y.
Step 9: Save the changes. Press Ctrl+X to exit the file. Type Y to accept the saving, then enter the filename to be written to, or simply press Enter to write to the existing file (first. txt in this example). The file will be saved in your current working directory.
Step 10: Display the contents of the file:
pi@raspberrypi: ~ $ cat first.txt
This simple text file demonstrates how to use nano. This is the last line of the example.
Nano is a simple and yet powerful text editor
pi@raspberrypi: ~ $
a Text editor,
a Python Program ● 33
Chapter 2 ● Using
Creating and Running
Figure 2.8: Move cursor to specified line and column.
Figure 2.9: Replacing text.
In summary, nano is a simple and yet powerful text editor allowing us to create new text files or to modify existing files.
2.2 Creating and Running a Python Program
You're now ready to start programming your Raspberry Pi 5 using the Python language. It is worthwhile to look at the creation and running of a simple Python program on your Raspberry Pi 5 computer. In this chapter, the message Hello From Raspberry Pi 5 will be displayed on your PC screen.
As described below, there are 3 methods that you can create and run Python programs on your Raspberry Pi 5.
2.2.1 Method 1 — Interactively from command prompt in Console mode
In this method, you will login to your Raspberry Pi 5 using the SSH and then create and run the Python program interactively. This method is excellent for small programs. The steps are as follows:
• Log in to the Raspberry Pi 5 using SSH.
• At the command prompt, enter python. You should see the Python command mode which is identified by three characters >>>
• Type the program:
print ("Hello From Raspberry Pi 5")
• The text will be displayed interactively on the screen as shown in Figure 2.10. Note that at the time of writing this book the Python version was: 3.11.2.

Figure 2.10 Running a Python program interactively
• Type Cntrl+z to exit from the program.
In this method, you will log in to your Raspberry Pi 5 using the SSH as before and then create a Python file. A Python file is simply a text file with the extension .py. You can use a text editor, e.g. the nano text editor to create your file. In this example, a file called hello. py is created using the nano text editor. Figure 2.11 shows the contents of file hello.py This figure also shows how to run the file under Python. Notice that the program is run by entering the command:
>>> python hello.py
Raspberry Pi 5 for Radio Amateurs ● 34
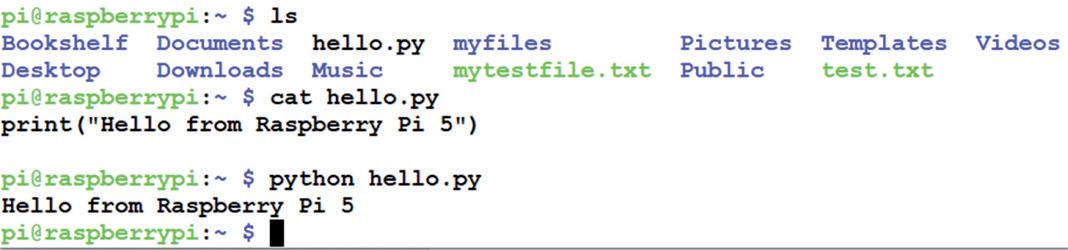
Figure 2.11: Creating and running a Python file.
In this method, you can login to your Raspberry Pi 5 using either a directly connected monitor and keyboard through the mini HDMI port, or if you don't have a monitor, you can login to the Desktop using the VNC as described earlier, and then create and run your Python programs in GUI mode using the Thonny IDE. It is worthwhile at this stage to learn the basics of using the Thonny IDE.
The 'Thonny' IDE
Start the Thonny IDE from the Desktop GUI under the Programming menu. Figure 2.12 shows the Thonny start up menu.
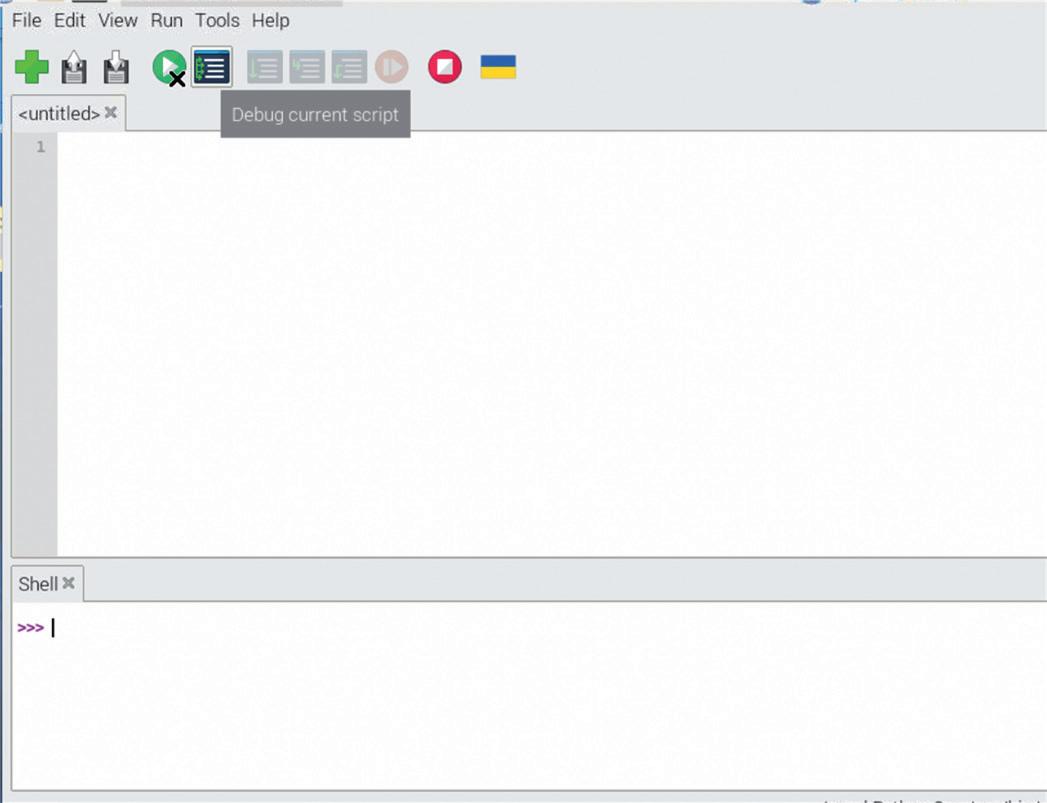
2.12: Thonny IDE startup menu.
The screen consists of two parts: the upper part is where you write your programs, and the lower part is the shell where small interactive program codes can be written. This part is mainly used for testing small program codes.
In the upper part contains the following menu items:
File: Open, close, or save a file.
Edit: Cut, paste, indent, select, toggle comment, uncomment, find & replace, clear shell.
View: Exception, files, help, notes, shell, stack, variables, font size, plotter.
Run: Configure interpreter, run script, debug script, stop/start, interrupt execution.
● 35
Chapter 2 ● Using a Text editor, Creating and Running a Python Program
Figure
Tools: Manage packages, open program folder, open data folder, and manage plug-ins. Help: Help contents, version history, report problems, about Thonny.
The Thonny IDE must be configured before it is used to write and upload programs to your Raspberry Pi 5. Click the bottom right corner of the screen to select your processor type and select Local Python 3. You are now ready to write your program. The steps are:
• Type the following code to the upper part of the screen: print("Hello from Raspberry Pi 5")
• Click File Save and save with the name hello.py (Figure 2.13)
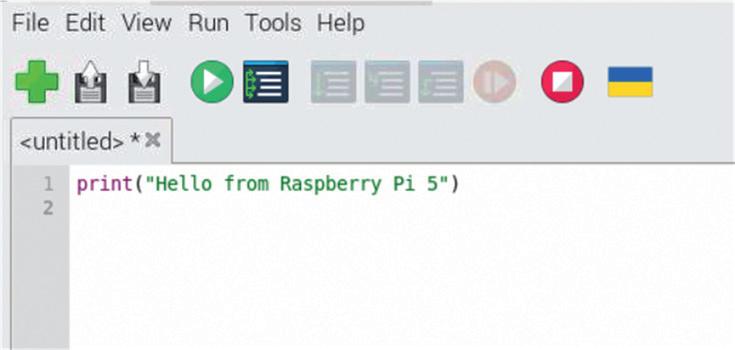
Figure 2.13: Type your program and then save it.
• Click the Run icon (green menu button at the top) to run the program. The output of the program will be displayed at the bottom of the screen as shown in Figure 2.14.

Figure 2.14: Run the program.
You can run small programs in interactive mode by entering them at the lower part of the screen under Shell. The results will be displayed under Shell immediately.
2.3 Which method?
The choice of a method depends upon the size and complexity of a program. Small programs can be run interactively in Shell under Thonny or directly in the Console mode (after typing python) without creating a program file. Larger programs can be created as Python files using the nano text editor and then they can then run either in the Console mode (after typing python followed by the filename with extension .py), or in Desktop GUI mode under the Thonny IDE. Running under the Thonny IDE has the advantage that justification of
Raspberry Pi 5 for Radio Amateurs ● 36
Chapter 2 ● Using a Text editor, Creating and Running a Python Program
the code is corrected automatically by the IDE as you write the code. In this book, the Thonny IDE is used for small programs and the nano text editor is used for larger programs to create the program files.
● 37
Raspberry Pi 5 for Radio Amateurs
● 300 Index 4-channel relay 98 555 Timer 77 A ACK 106 AC parameters 83 active cooler 15 active low-pass filters 69 AD9850 127 ADALM-Pluto 250 AGC 204 air-core 56 AirSpy HF+ 251 air traffic data 226 Aldo 252 alsamixer 185 Antenna Kit 192 APRS 278 APRS filters 281 astable 77 Astable circuit 78 Audio Adapter 184 Audio Output 184 audio power amplifier 175 Audio Volume 185 Auto boot 182 B base current 67 Battery operation 182 BFSK 239 BJT transistor 66 BladeRF 248 Bluetooth 24 Bookworm 15 Built-in Audio 214 Butterworth 74 C Cauer topology 75 CE 121 Ceramic capacitors 44 CHIRP 277 collector current 67 Common-Emitter 83 Console mode 16 Cortex-A76 14 CPHA 121 CPOL 121 CQRLOG 265 CubicSDR 220 cut-off frequency 70 CW 232 CW transmission 232 D DAB 271 DAB+ 272 DC remove 203 Decimation 216 Demod Off 204 Desktop GUI 21 DGPS 113 DHCP 23 Digital-to-Analog Converter 120 dipole antenna 192 Dipole orientation 193 Direct Sampling 216 direct sampling mode 189 DNS 23 dot time 141 DSI displays 14 DTMF 229 Dump1090 226 duty cycle 78 DVB-T 196 DX Clusters 297 E EchoLink 293 Electrolytic capacitors 44 F FFT Averaging 205 FFT rate 205 FFT Settings 203 Filter shape 204 Filter width 204
Index ● 301 FLDIGI 229 FLRIG 285 FM Radio 167 FreeDV 291 Freq Correction 203 Frequency Counter 161 Freq zoom 206 G Gain Control 216 git clone 210 GNU Radio 201 GPredict 253 GPS 112 GPS Click board 113 GPS receiver 112 GPS satellites 112 GQRX 201 GREEN LED 95 H HackRF One 246 Ham Clock 273 Hardware AGC 203 Hermes Lite-2 242 horizontal polarization 193 I I2C based LCDs 105 I2C bus 105 ifconfig 19 Impedance matching 80 Inductance 56 inter-character time 141 inter-word time 141 IP address 19 IQ balance 203 IQ correction 216 J JST-SH 116 K keypad 130 Klog 266 L latitude 112 LCD 105 LimeSDR 249 LM386 175 LM567 151 load impedance 80 Logic Probe 95 longitude 112 Loudspeaker 175 Low-pass filters 69 L-type matching 80 M Matplotlib 54 matrix equation 63 maximum power transfer 80 MCP4921 120 Mesh analysis 60 Mic click 150 microphone input 184 MISO 121 monostable 77 Morse2Ascii 268 Morse code 140 Morse Decoder 149 MOSI 121 MySQL 265 N nano 29 Narrow FM 204 NAVTEX 239 NMEA sentence 112 Node Analysis 63 NooElec NESDR 247 normally closed 99 normally open 98 O Odyssey 242 Offset Tuning 216 Opera Cake 247 OP Mode 239 optocoupled relay 98
Raspberry Pi 5 for Radio Amateurs
● 302 P Parallel LCDs 105 Passive filters 74 password 20 PCIe connector 14 Peak Detect 206 PortAudio 229 potential divider 48 Power Control 98 PPM Correction 217 PulseAudio 229 Putty 19 PyQSO 269 Python plotting 54 Q Qtel 293 Quisk 242 R R828D 190 RadioBerry-2 242 raspi-config 18 Raw I/Q 204 RC circuits 53 RC transient 53 Real-Time-Clock 103 RED LED 95 Red Pitaya 242 resistive attenuator 51 Resistor Color Code 38 resonant frequency 58, 194 resultant capacitance 46 resultant resistance 42 RG174 192 RLC circuit 58 Rotary Encoder 140 RTC 104 RTL_433 244 RTL2832U 188 RTL-SDR V3 189 RTL-SDR V4 190 RTTY 238 S Sallen-Key 70 Sample Rate 216 Satellite reception 194 SCLK 121 SDR++ 210 SdrMicron 242 SDR Sharp 223 Serial Debug port 115 serial mode 128 Series-shunt 80 shell script 200 Shunt-series 80 Simulation 88 Single payer coils 56 SN74LV8154 162 SNR Meter 215 SoC 15 SoftRock 242 source impedance 80 SPI Bus 121 Squelch 205 SSH 18 SSTV 282 START bit 106 startx 211 Static IP Address 23 Station Clock 103 STOP bit 106 Streaming audio 208 Swap I/Q 203 switching speed 153 T T-connector 102 TEA5767 167 telescopic antennas 192 The Q factor 70 The spectrum display 215 Thonny IDE 35 tightvncserver 21 TightVNC Viewer 22 TINA-TI 88 tone decoder 151 transistor amplifier circuit 83 transistor current gain 66 Tuning Mode 215 TWCLOCK 262
Index ● 303 U UART 115 UGREEN 184 upconverter 189 USB-C 14 USB dongle 188 USRP 250 V vertical polarization 193 Very Small Resistors 40 VNC clients 22 VNC server 21 VoIP 293 W waterfall 205 Waveform generators 120 Weather Fax 233 WEFAX 233 Welle.io 271 WFM 204 whip antenna 194 Wired Network 24 words per minute 141 wpm 141 WSJT-X 298 X Xastir 278 XASTIR 278 xcwcp 252 XDX 297 XyGrib 288
booksbooks
Raspberry Pi 5 for Radio Amateurs
Program and Build Raspberry Pi 5 Based
Ham Station Utilities with the RTL-SDR
The RTL-SDR devices (V3 and V4) have gained popularity among radio amateurs because of their very low cost and rich features. A basic system may consist of a USB based RTL-SDR device (dongle) with a suitable antenna, a Raspberry Pi 5 computer, a USB based external audio inputoutput adapter, and software installed on the Raspberry Pi 5 computer. With such a modest setup, it is possible to receive signals from around 24 MHz to over 1.7 GHz.
This book is aimed at amateur radio enthusiasts and electronic engineering students, as well as at anyone interested in learning to use the Raspberry Pi 5 to build electronic projects. The book is suitable for both beginners through experienced readers. Some knowledge of the Python programming language is required to understand and eventually modify the projects given in the book. A block diagram, a circuit diagram, and a complete Python program listing is given for each project, alongside a comprehensive description.
The following popular RTL-SDR programs are discussed in detail, aided by step-by-step installation guides for practical use on a Raspberry Pi 5:
> SimpleFM
> GQRX
> SDR++
> CubicSDR
> RTL-SDR Server
> Dump1090
> FLDIGI
> Quick
> RTL_433
> aldo
> xcwcp
> GPredict
> TWCLOCK
> CQRLOG
> klog
> Morse2Ascii
> PyQSO
> Welle.io
> Ham Clock
> CHIRP
> xastir
> qsstv
> flrig
> XyGrib
> FreeDV
> Qtel (EchoLink)
> XDX (DX-Cluster)
> WSJT-X
The application of the Python programming language on the latest Raspberry Pi 5 platform precludes the use of the programs in the book from working on older versions of Raspberry Pi computers.

Dogan Ibrahim has a BSc degree in electronic engineering, an MSc degree in automatic control engineering, and a PhD degree in digital signal processing. Dogan has worked in many industrial organizations before he returned to academic life. Prof Ibrahim is the author of over 70 technical books and published over 200 technical articles on microcontrollers, microprocessors, and related fields. He is a Chartered electrical engineer and a Fellow of the Institution of the Engineering Technology. He has been a licenced amateur radio operator for several decades (G7SCU) and also holds an Arduino certification.

Ahmet Ibrahim holds BSc (Hons) and MSc degrees in the fields of computing, software and networking. Ahmet has held positions in many industries involved in enterprise computing. He enjoys advising, designing and implementing complex cloud and on-premises computer systems. Ahmet is an experienced electronics engineer and a licenced amateur radio operator (2E1GUC).
Elektor International Media www.elektor.com