17 minute read
Stage 5: How to Improve Your Digital Footprint
Next Article

Now that you have established an online presence with a website and social media accounts, it’s time to further solidify your digital footprint by adding different tools to your website and online presence.
Google Analytics
Stage 5: How to Improve Your Digital Footprint
2. Set up a property in your Analytics account. A property represents your website or app, and is the collection point in Analytics for the data from your site or app. 3. Set up a reporting view in your property. Views let you create filtered perspectives of your data; for example, all data except from your company’s internal IP addresses, or all data associated with a specific sales region. 4. Follow the instructions to add the tracking code to your website so you can collect data in your Analytics property.
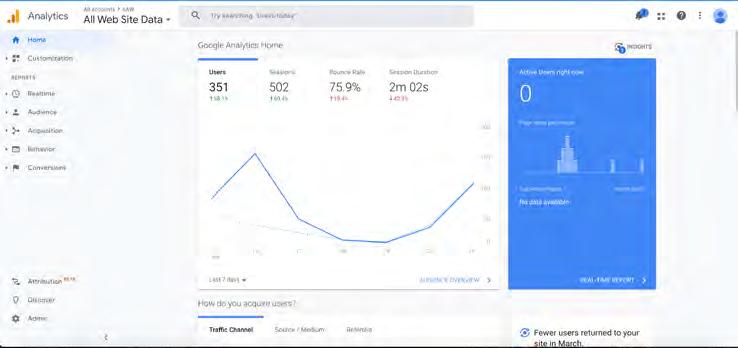
Google Analytics is the popular platform to help you see the performance of your website including number of visitors, which pages are most popular, bounce rate, duration spent on page and more. For beginners, you are able to see what pages are most popular and spend more time on making sure they are complete, useful and always updated. If you dig deeper into the platform, you can start tracking how an individual uses your website such as what page they start on, what page they go to after and what page they leave on. You are even able to see realtime statistics on who is on your page, their location and more.
How to Add Google Analytics to Your Website
To begin the process, first create an account. Google has created step-by-step directions.
To start collecting basic data from a website: 1. Create or sign in to your Analytics account: Go to google.com/analytics Do one of the following: To create an account, click Start for free. To sign in to your account, Click Sign in to Analytics. Watch Video: Google Analytics: First Steps
Google makes the setup process relatively straight-forward when adding Google Analytics to your website. After you set up an Analytics account, you have a unique code that needs to be added to the back-end of your webpage. Google provides this “script” which is a fancy name for a code that when loaded in a browser, pings Google Analytics to let the program know that the user is accessing the particular URL (which corresponds to a webpage) and more. The script is accessible by:
1. Going to Google Analytics https://analytics.google.com/analytics/web/ and logging in 2. Click on the settings icon in bottom left of the screen 3. Click on Tracking Info under the Property section 4. Click Tracking Code 5. There you will see a Global Site Tag to add to your site.
This tracking code can be added a site-wide Meta Tag field if your platform has that. Otherwise, this code needs to be placed above the “<head>” section of the HTML code. Once this is implemented on every page or sitewide, you are all set up and can let the tracking begin!
For more information and details about Analytics, review Google’s Help Page.
Stage 5: How to Improve Your Digital Footprint
Google Search Console
Google Search Console is a tool that measures your search traffic in Google’s search engine and shows what individuals search for when they are seeing your website pop-up. It also displays where your website shows within the search results (rank order) and the number of clicks. There are other analytics such as site performance each day as well as a section they call “coverage”. This is where it shows the results of Google’s system “crawling” your website and identifying potential issues on web pages that hurt its search result ranking. It is a powerful tool, especially for agents, as you can see what people in your area are searching Google for and where your agency is showing in search results. You may be surprised how many views/impressions your website receives in Google Searches.
How to Set Up Google Search Console
Go to Google Search Console’s website, here, where you can click “Start now” to create your account. This will start the step-by-step process. After entering in your website URL, you may get to a step that may cause confusion.
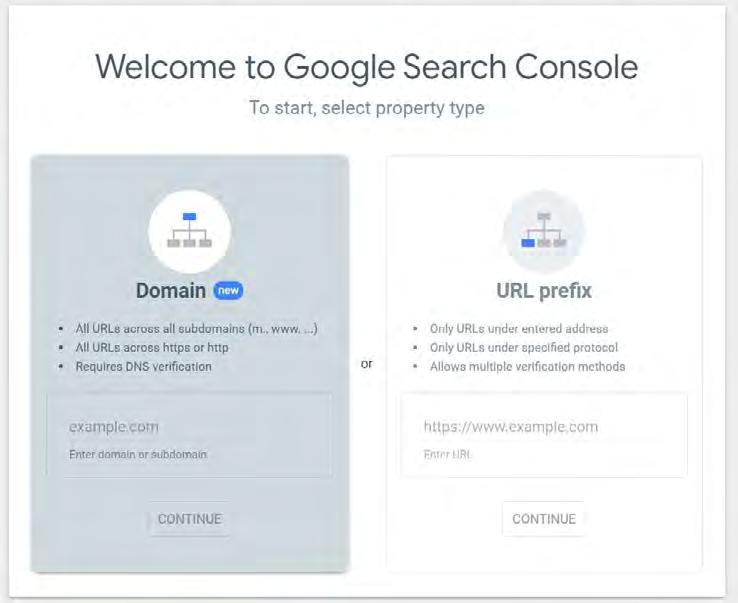
It’s going to ask to select a property type, as shown below. It is recommended to select the URL prefix option as that is easier for setup, however, if you or your MSP that handles your website has access to the DNS configuration, the option on the left is the better option.
Domain Verification
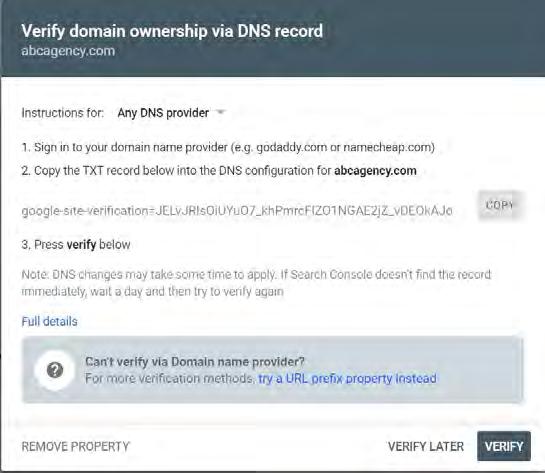
It asks, “Verify domain ownership via DNS record”. This is asking you to verify that you own the website by uploading a string of text to a particular part of your website.
Stage 5: How to Improve Your Digital Footprint
URL Prefix Verification
This option is easier to verify. After entering your domain (https://________.com), it asks to upload a file to your website. If you have a file manager or a resource manager, this is the best place to upload the file and verify you own the website. If you already have Google Analytics on your website, you are able to verify your domain that way as well.
Tip: With the URL Prefix Verification, every form of your URL will need to be verified including both https:// and http://.
Here is a quick video demonstrating the verification process.
After you have set up Google Search Console, begin monitoring your performance and seeing what queries or searches are receiving the most clicks and what are receiving the most impressions. It’s recommended that you play around with the site and analytics to see all of the different data points and your most popular pages based on search results.
Another task to complete within Google Search Console is to upload a sitemap. This allows Google to crawl and index your site faster and can help with improving your ranking in search results (or where your website shows in search results). If you have a sitemap on your website, this can be linked directly, or you can use a tool such as XML Sitemap Generator and have a sitemap created for you. This XML file can then be uploaded to your website’s file or resource manager and that link can be copied and pasted to Google Search Console’s “Sitemap” section.
Just like Google Analytics, once you are set up properly with Google Search Console, you are ready to indulge and sift through all of the data points collected. This is another very powerful digital marketing tool.
Google My Business
Google My Business is a free business profile on Google that you are able to manage and customize. For instance, when you use Google Maps or search on Google, “Insurance near me” or “Insurance in [city]”, the first few listings are often business listings. How your business appears can be customized through the Google My Business profile. Setting up a profile is easy and helps refer people to your website or easily find your phone number to call you. It’s absolutely necessary to have a Google My Business account to target local customers.
Here are the steps to creating your account:
1. Go to Google My Business (Google.com/business) 2. Select “Manage Now” 3. Enter Your Business Name 4. Enter Business Address 5. Select appropriate check boxes 6. Choose your business category 7. Add your phone number and website 8. Choose verification option - they offer a variety of ways including postcards, phone, email, etc. 9. You’re Done! But now it’s time to optimize your business page.
Steps to Optimizing Your Google My Business Page 1. Go to the Google My Business dashboard 2. Click the listing you’d like to work on 3. Select “Info” 4. Complete section by entering in applicable information such as hours, description, attributes. You are able to edit each section by clicking the pencil on the right side. 5. Next, go to the “Photos” section and add photos! You are able to add your logo, cover photos, interior and exterior photos, your team, etc.
Stage 5: How to Improve Your Digital Footprint
For more information regarding the setup of your Google My Business listing, HubSpot has a great step-by-step post with screenshots.
Google Ads
Within Google My Business, you have access to very important analytics in the “Insights” section. Here you will see Google search queries that were used to search your business, where customers view your business, customer actions and where direction requests to your business came from. These are critical data points to keep an eye on to see what your business is doing well and where you can improve. If you are not getting the attention you think you should be, it may be worth spending more time in refining your profile until your business profile performs in search results at the level you desire. You may even consider looking into Google Ads, the advertising platform on Google.
You are likely familiar with ads that appear on Google searches. Due to the popularity of Google, Google Advertising is one of the best ways to generate leads. It’s a fact that the first search result receives a large percentage of the clicks in the results, but to be first in the search results isn’t always cheap.
Get started with Google Ads here. 1. Go to the Google Ads page. 2. Click “Start Now” 3. Select your campaign goal 4. The type of campaign or ad you want to display. Each type of ad is explained below the icon. 5. Select the type of action you want the user to perform (such as going to your website) 6. The next page allows you to choose your Daily budget and the type of bidding. If you setup conversions (such as completing a quote request), that is a good option to choose, otherwise clicks is the next best option. Bidding means that Google will automatically “bid” with the highest bids for a certain action will be shown in search results. For clicks or conversions, you are only charged when that action is performed (someone clicks to go to your website), NOT when your website appears in search results. 7. Select additional options as necessary 8. The next section will show Set Up Ad Groups. Here you will select different groups. But the most important part is selecting keywords. a. keyword = broad match = anything related to those words may trigger your ad to show in the results b. “keyword” (in quotes) = phrase match = if certain parts of the phrase in quotes match the search query, your ad may show in the results c. [keyword] (in brackets) = exact match = your entire phrase in brackets must be part of the search query in order for your ad to show
The best option is up to you. It’s recommended to be specific and brainstorm phrases someone looking for your business would search. For an insurance agent in Madison, WI, they may choose “Insurance in Madison, WI” or “Auto Insurance Quote in Madison, WI” (in quotes) to avoid a broad match and make sure the user searching is more likely in the market that you serve. You can add as many keywords as you would like. Obviously the more keywords you enter, the more clicks on your website. If you are looking for a specific market, only having 3 or 4 keywords may be appropriate.
After you are done with keywords, click “Save and Continue”
9. On the next section you create your ads. You select the URL, the headline and a description. 10. Lastly, Google has you enter billing information and you are on your way to publishing ads on Google search results!
If you need assistance with this task or looking for more information on Google Ads, Google created a very informative guide here. You will find best practices, YouTube videos and more to help you with your marketing campaign.
Stage 5: How to Improve Your Digital Footprint
Facebook Ads
Facebook advertising is another way to further increase your digital footprint. Within Facebook, there are two options to advertise, first is by “boosting” a post and the other is through the Ad Manager. Boosting a post is quick, easy and requires an existing post on your Facebook page while the Ad Manager is more customizable and complex. With Facebook, you can decide what metric will determine when you are charged. Typically, each like or link-click will cost you a few.
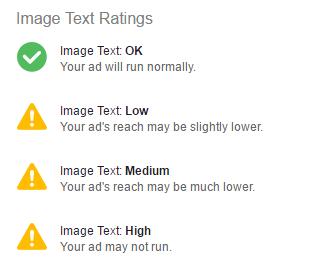
Note: While Facebook no longer has the 20% text rule in images. we still suggest keeping your text under 20% on an image you plan to promote to reach your entire audience potential. According to Instapage, “Under Facebook’s new guidelines, an ad won’t be outright rejected if it contains more than 20% text, but it will have its reach limited - significantly.Instead of using a “run or reject” system, Facebook will categorize your ad according to the following ratings:
Boosting a Post 1. Create and post a Facebook post from your business 2. View the post and click “Boost Post” 3. Follow and complete the options provided including what results you would like from the post, the post button, duration and budget, and most importantly your audience. 4. Once this is complete, select “Post” and Facebook will review your post and publish!
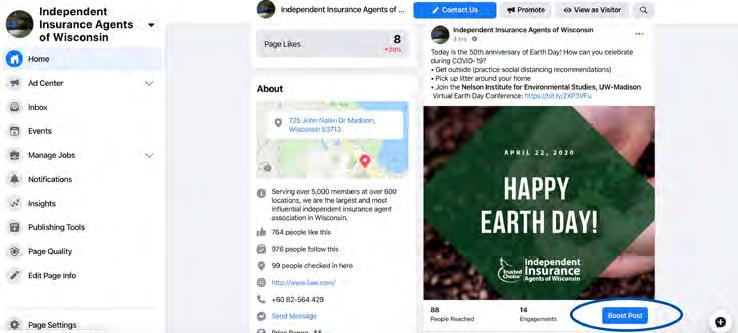
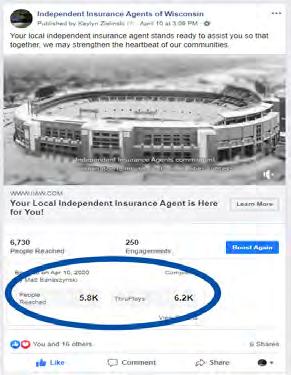
After you’ve boosted a post on Facebook, you will see the stats right under the boosted post.
Stage 5: How to Improve Your Digital Footprint
Creating an Audience
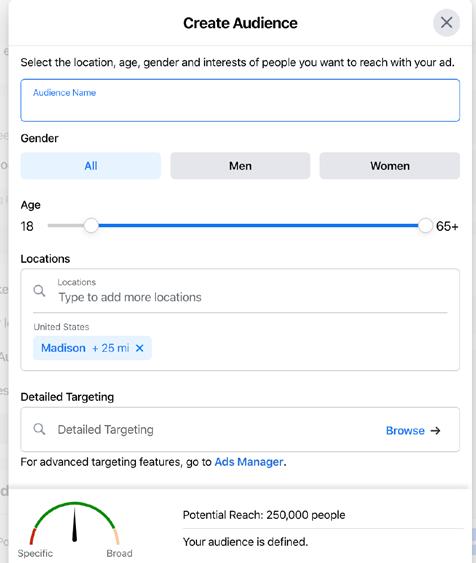
An audience in Facebook’s Ad Manager is one of the most critical aspects of advertising on Facebook as it determines who your ad is shown to. Your audience can be defined by location, age, gender, languages, behaviors, interests, demographics, connections and look-alike audiences. As you can imagine, you can get quite detailed with who your ad is shown to. The most important options are location and demographics.
Depending on what your post is describing or trying to sell, your target demographics will change. However, for the most part, the location of your target market is going to stay relatively the same, so don’t forget to set the location or else the whole world could click your ad and that is ineffective/wasted marketing dollars. c. Ad
i. Identity ii. Format iii. Media iv. Text & Links v. Languages vi. Tracking
In general, a Facebook Ad can be as simple or complex you would like. The more details you add, often the better the results will be. Again, use the audience filter wisely to narrow your target audience down by location and choose the style and formatting you like best and that you believe resonates well with your prospects.
Ad Manager 1. Go to Ads Manager (This page shows your Ad Accounts) 2. Click the top left corner and click “Ads Manager” 3. This is your dashboard where you can see Campaigns, Ad Sets, and Ads. Think of it as multiple Ads make up one Ad Set and multiple Ad Sets make-up one Campaign. So create an ad, you need to go to “Campaigns” and select “+ Create” 4. This will allow you to select a variety of options
a. Campaign i. Special Ad Category ii. Objective b. Ad Set i. Traffic ii. Dynamic Creative iii. Offer iv. Audience v. Placements vi. Budget & Schedule
If you need a detailed walkthrough of the Facebook Ads Manager, Hootsuite offers a very detailed Guide titled, “How to Advertise on Facebook in 2020: The Definitive Facebook Ads Guide”.
How to Create a LinkedIn Ad
1. Create a LinkedIn page for your business by clicking here. 2. Next, go to your Campaign Manager. This can be accessed by clicking the 9 dots organized in a square in the top right corner and clicking advertise. Otherwise click here. 3. Create an Ad Account (More information Here) 4. Now go to Campaign Manager 5. From the Campaign Manager, you will see you have Accounts, Campaign Groups, Campaigns and Ads tabs. Accounts will show the business name associated with the ad - most will only have one but if you have multiple locations, you may have multiple accounts. Within accounts, you have Campaign Groups which are made up of Campaigns and then Campaigns include 1 or more ads. 6. Select Create a Campaign button. 7. Select options you would like such as your objective, ad spend, etc. 8. Next, there is an audience section for you to complete. First, you’ll see a location filter. (Make sure to filter the location to only include your target market area. Don’t waste your ad dollars.) You may be as broad as Wisconsin or you may type in a list of cities. a. As you narrow down your audience, LinkedIn requires you to select “Narrow Audience Further (And)” for each additional filter you add. b. Add filters that are appropriate for your advertisement. This may include age, the industry individual works in (under Company) or interests and traits. It’s important to be broad but you also want some filters so the ad is appropriate for the audience 9. Select ad format 10. Upload your ad 11. Review and Launch
You can also take a post you’ve already shared and “boost” it just like on Facebook!
Google Chrome’s Lighthouse
Give yourself a pat on the back for making it this far! You’re doing great!
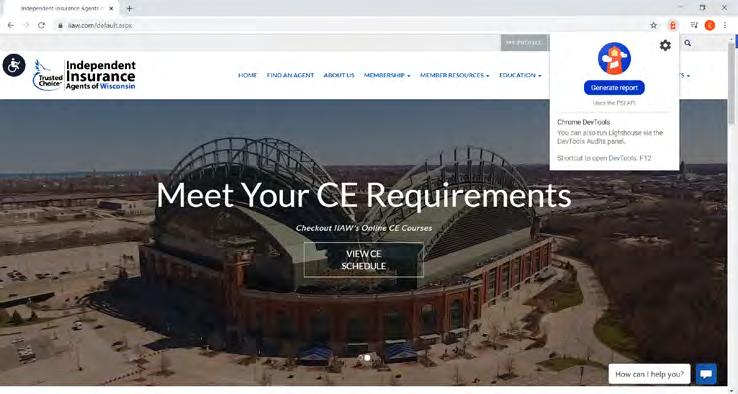
The Google Chrome browser has a tool built into it that is actually designed for web developers, but provides great value even from a high level. This tool, Lighthouse, is an open-source, automated tool for improving the performance, quality and correctness of your website. According to the overview page, “When auditing a page, Lighthouse runs a barrage of tests against the page, and then generates a report on how well the page did. From here you can use the failing tests as indicators on what you can do to improve…”.
The reports page that Lighthouse provides is very detailed and uses a lot of web developer jargon. It may not be a report that you are able to fully interpret, which is okay. If you use a MSP or web developer for your website, they should be able to utilize it to improve your website. Even from a high-level, the report is able to provide you with a score of each page you test and may have recommendations that are relatively basic.
Here is How to run a Lighthouse Performance Audit:
By utilizing Lighthouse and implementing recommended changes, you will improve how your web page performs on Google search results. Remember, the audit is only for that single page you are on, not for the entire website. In order to scan and audit your website, you need to repeat the audit on each individual web page. If time is limited, your homepage should be your first priority.
This is another powerful tool and a way for you to improve your website. After making changes, your web page may not look any different, but when Google “crawls” or scans your web page, making these changes will improve the performance.
For more information, view the Lighthouse information page. You may also be interested in watching a demo video from Google Chrome Developers here.
1. Download the Google Chrome browser here 2. Open Google Chrome 3. Go to the webpage on your website that you would like to test 4. Right click on your mouse 5. Select “Inspect” 6. On the new window that opens up, within the top menu click on the two right arrows (just right of the “Performance” option) to extend the menu 7. Select “Audits” 8. Select the categories you would like to test (you can select all the categories) 9. Select whether you want to test it on a mobile or desktop device 10. Click “Generate Report” 11. Review Report
To Export Report 1. Click the three dots in the top right under the X (not to the left) 2. Select “Print Summary” or “Print Expanded”